Reducers are used to transition from WPC flooring to floors of different height with a minimum height difference of 1/4 inch.
Product Features
- Used to fill the gap between two floors of unequal height
- Surface material: High wear resistant aluminum oxide laminate
- Core material: Moisture resistant MDF
Materials and Tools:
- Metal track – included with Overlap Reducer
- MDF shim – included with Overlap Reducer. Additional shims available as model number VTSHIM12.
- #6 x 5/8″ wood screws (when using track on wood subfloors)
- #6 x 1″ wood screws + 0.375″ x 1.25″ wood dowel pins OR screws + plastic all-purpose anchors (when using track on concrete subfloor)
- Pencil
- Tape measure
- Saw
- Screwdriver
- Drill with masonry drill bit (when using track on concrete subfloor)
- Construction adhesive
- Damp cloth
Installation Procedure: With Track, Without Glue
Step 1: Install the flooring planks, including the underlayment by leaving a 1″ (25 mm) wide gap between the vinyl and the WPC floor for the installation of the reducer molding.

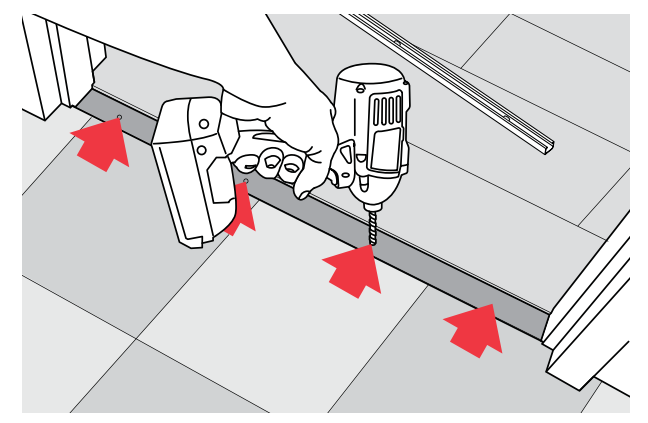
Step 2: Center the track between the vinyl and WPC floor and screw it to the subfloor with #6 x 5/8″ wood screws.
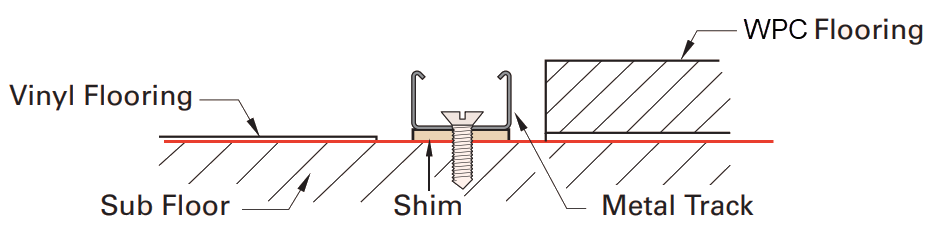
Step 3: Gently press the molding into the track, starting from one end and progressing toward the other. DO NOT TRY TO PUSH THE ENTIRE MOLDING IN ALL AT ONCE.

Installation Procedure: With Track, on Concrete
![]() Never drill into a slab that has radiant heating installed. Be aware of potential gas, electrical, water or low voltage lines present in the slab before starting your project. If unsure about these circumstances, we strongly recommend to use a glue down installation instead. The glue down option requires a high quality construction adhesive.
Never drill into a slab that has radiant heating installed. Be aware of potential gas, electrical, water or low voltage lines present in the slab before starting your project. If unsure about these circumstances, we strongly recommend to use a glue down installation instead. The glue down option requires a high quality construction adhesive.
Step 1: Install the flooring planks, including the underlayment by leaving a 1″ (25 mm) wide gap between the vinyl and the WPC floor for the installation of the reducer molding.

Step 2: Cut track to length. When placing in a doorway, cut the track so it stops 1/2″ short of the doorjamb on each side. Lay the track in the position to be installed, and mark the holes with a pencil on the concrete floor. Make sure the track does not shift when marking each hole.

Step 3: Lay the track aside and drill into the concrete by means of a 1/4″ masonry drill bit. Make sure the drill does not “dance” off the mark when starting to drill, as it will otherwise bend the track when affixing to the floor. Drill only as deep as your selection of dowel/screw combo requires. Never drill deeper than 1-1/2″ into the concrete.
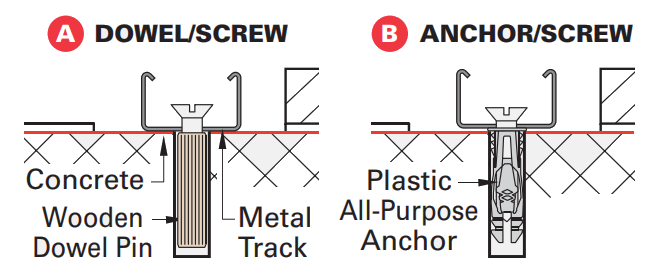
Step 4: Use your preferred method of screw+dowel combo.
- A: Screw + 0.375″ x 1.25″ Wooden Dowel Pin: With #6 x 1″ screws, this option will give you a bit more flexibility in case the holes are not 100% in line with the track holes. Make sure you drive the wooden dowel flush with the concrete. If it sits a bit high, scrape it flush with a chisel.
- B: Screw + Plastic All-Purpose Anchor: Start all screws in each hole before you tighten each one all the way down. This will ensure that all holes line up properly with the track.
Step 5: Gently press the molding into the track, starting from one end and progressing toward the other. DO NOT TRY TO PUSH THE ENTIRE MOLDING IN ALL AT ONCE.

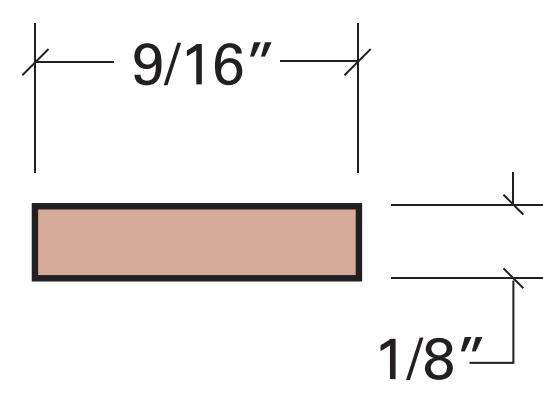
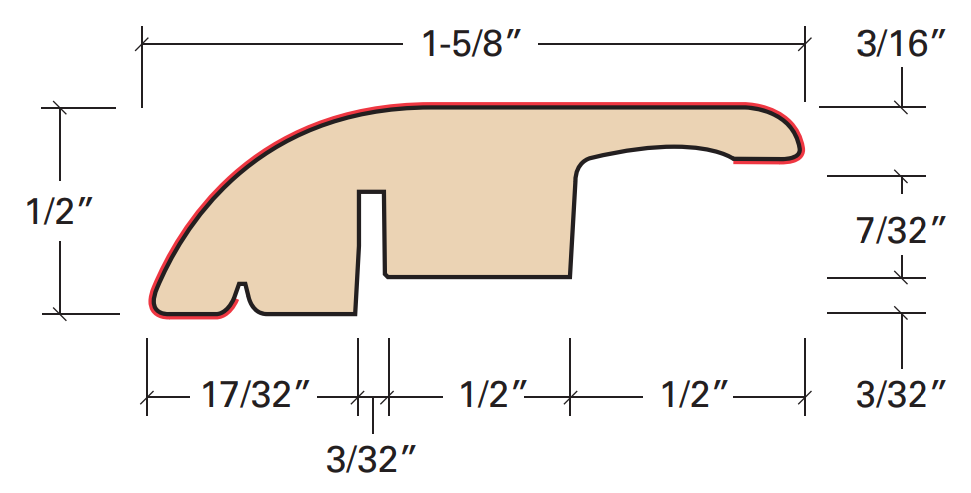
Product Dimensions
Length: 94″ (238.76 cm)
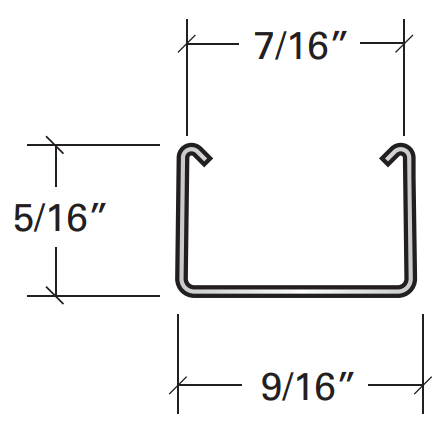
Track Dimensions
Track is included with overlap reducer.
Length: 94″ (238.76 cm)
Shim Dimensions
Shim is included with Overlap Reducer. Additional shims available as model number VTSHIM12.
Length: 94″ (238.76 cm)