
See attachments at bottom for French and Spanish language versions.
THANK YOU FOR CHOOSING AHF PRODUCTS FLOORING
If properly installed and cared for, your new flooring will be easy to maintain and will look great for years to come.
These directions are based on industry standards and best practices. Failure to follow these installation instructions may result in damage to the flooring and void the floor’s warranty.
- For complete warranty information call 1-866-243-2726 or go to www.ahfproducts.com.
- For technical or installation questions, or to request a Safety Data Sheet, please call 1-866-243-2726 or visit www.hardwoodexpert.com, our technical website.
- For general questions or comments, please visit us at www.ahfproducts.com or call 1-866-243-2726.
| WARNING: EXISTING IN-PLACE RESILIENT FLOOR COVERING AND ASPHALTIC ADHESIVES. DO NOT SAND, DRY SWEEP, DRY SCRAPE, DRILL, SAW, BEADBLAST, OR MECHANICALLY CHIP OR PULVERIZE EXISTING RESILIENT FLOORING, BACKING, LINING FELT, ASPHALTIC “CUTBACK” ADHESIVE, OR OTHER ADHESIVE. These existing in-place products may contain asbestos fibers and/or crystalline silica. Avoid creating dust. Inhalation of such dust is a cancer and respiratory tract hazard. Smoking by individuals exposed to asbestos fibers greatly increases the risk of serious bodily harm. Unless positively certain that the existing in-place product is a non-asbestos-containing material, you must presume it contains asbestos. Regulations may require that the material be tested to determine asbestos content and may govern removal and disposal of material. See current edition of the Resilient Floor Covering Institute (RFCI) publication Recommended Work Practices for Removal of Resilient Floor Coverings for instructions on removing all resilient floor covering structures or contact your retailer or AHF Products at 866 243 2726. AHF floor coverings and adhesives do NOT contain asbestos. |
| Gauge | Size | Adhesive |
| .197 in (5 mm) | 7˝ x 48˝ (177.8 x 1219.2 mm) | Bruce® BondLink™ & Apex Pro™ |
| .197 in (5 mm) | 9˝ x 60˝ (228.6 x 1524 mm) | Bruce® BondLink™ & Apex Pro™ |
| .197 in (5 mm) | 12˝ x 24˝ (304.8 x 609.6 mm) | Bruce® BondLink™ & Apex Pro™ |
| .197 in (5 mm) | 16˝ x 32˝ (406.4 x 812.8 mm) | Bruce® BondLink™ & Apex Pro™ |
ADHESIVES:
If a full spread glue down installation is desired with Loose Lay LVT, use the recommended adhesive found in the glue down option chart above and follow the manufacturer’s instruction for the adhesive application.
INSTALLATION:
Location: All grade levels
Fitting: All methods
TOOLS:
Tape measure, chalk line, utility knife, pencil, spacers, straight edge, vacuum or broom and optional tile cutter or cutting shear; subfloor prep supplies; recommended adhesives if using full spread method.
KEYS TO SUCCESSFUL LOOSE LAY LVT INSTALLATION:
- Loose Lay LVT should not be exposed to direct sunlight for prolonged periods. Direct sunlight can result in discoloration, and excessive temperatures may cause expansion. The use of drapes or blinds is recommended during peak sunlight exposure. When this cannot be avoided, use the full spread installation method.
- Most installations will need approximately a 10% cutting allowance added to the square footage of the room.
- Always work out of at least three cartons to mix shade and visual.
- Proper conditioning of both the jobsite and the flooring is necessary. LVT should not be exposed to sudden changes in temperature.
- Store, transport, and handle LVT so as to prevent any distortions. Store cartons flat, never on edge. Distortions will not disappear over time. Ensure that the planks/tiles are laying flat at time of installation.
- Installations of carpet, metal strips and other transition moldings should not push fully into the flooring and should allow for some slight movement wherever practical.
- Protect the floor from heavy-rolling loads, other trades and replacement and/or movement of appliances by using sheets of plywood or similar.
- LVT alone is waterproof but excessive subfloor moisture may promote mildew or mold issues
GENERAL INFORMATION:
The loose lay installation system allows the planks/tiles to be installed without using adhesives for installations not exceeding 215 sq. ft. The planks/tiles should be installed tight to all vertical surfaces such as walls, cabinets, pipes, etc. For installations exceeding 215 sq. ft., the full spread adhesive installation must be used. See product and recommended adhesive chart below.
Base cabinets should not be installed on top of the planks/tiles when using the loose lay installation.
NOTE: For all installations open several cartons and mix them as they are installed to help blend any slight shade differences from one carton to the next.
Before starting the installation, verify that the material is of the correct style, color, quantity, and run numbers, and ensure that the correct adhesive has been selected for area of usage. Also, confirm that all pre-installation requirements, as detailed in the remainder of this section, have been satisfactorily completed. Start of flooring installation indicates acceptance of current subfloor conditions and full responsibility for completed work.
CHECK RUN NUMBERS AND MANUFACTURE DATE:
To determine manufacture date, locate the run number on the short end of the carton. It is the eight-digit number separated by decimal points beginning with the two-digit day, then the two-digit month, and finally the four-digit year: DAY.MONTH.YEAR-29.10.2020.
Locate the run number on the short end of each carton and verify that all of the material for your job is from the same run. Minor shade variations within the same run number contribute to the natural look of Loose Lay LVT.
To avoid noticeable shade variations, do not install material from different runs across large expanses
GENERAL STORAGE:
Store all materials flat and off of the floor in an acclimatized, weather-tight space between 65°-85°F (18°-29°C).
Store, transport and handle all flooring to prevent any distortions. Store cartons flat – never on edge. If distortions do occur, they will not disappear over time. Ensure that the planks/tiles are flat at time of installation.
Most installations will need approximately a 10% cutting allowance added to the square footage of the room.
Do not compress the edges of the planks/tiles in any way when installing other flooring materials next to Floating LVT. Installations of carpet, metal strips and other transition moldings should not pinch the flooring and should allow for slight movement wherever practical.
SUBSTRATES:
LVT Loose Lay is ideal for use in both new construction, renovation projects, or any other project where speed of installation is required. The combination of a fiberglass reinforced middle layer with multiple “hot-pressed” layers, makes LVT unprecedented in strength, performance and overall quality. LVT is intended for interior use only and is suitable for above-grade, on-grade and below-grade in applications.
All substrates listed below must be properly prepared and meet certain requirements. There may be other exceptions and special conditions for these substrates to be suitable for the loose lay installation system as noted below. The application of subfloor preparation materials must be in strict accordance with the manufacturer’s instructions. All warranties and guarantees pertaining to the suitability and performance of any preparation or ancillary product rests with that material manufacturer or the Flooring Contractor.
Embossing levelers, patches, concrete, gypsum-based products and other such items are the sole responsibility of the Flooring Contractor, General Contractor, and/or manufacturer of the particular sub-flooring product.
SUITABLE SUBSTRATES INCLUDE:
- Concrete – dry and smooth on all grade levels
- Suspended wood subfloors with approved wood underlayments – must have minimum of 18˝ well-ventilated crawl space underneath
- Suspended hardwood flooring that is fully adhered, smooth and square edge without texture
- Single-layer, fully-adhered, existing resilient floors – must not be foam-backed or cushion-backed
- Ceramic tile, Terrazzo, Marble
- Polymeric Poured (seamless) floors
- Fully-sanded OSB
- Steel, Stainless Steel, Aluminum
DO NOT INSTALL OVER:
- Particleboard or waferboard
- Existing resilient tile floors that are below grade
- Existing cushion-backed vinyl flooring
- Carpet/Carpet pad
- Hardwood flooring that has been installed directly over concrete
- On stairs or in rooms with sloping floors or floor drains
- Floating floors
- Cement tile backer boards
- Ferrous substrates
- Sleeper substrates
LOOSE LAY LVT IS NOT RECOMMENDED:
- In locations where the space beneath the building structure is exposed to the elements
- For use in direct sunlight, as it may cause Loose Lay LVT to fade, buckle or the joints to separate; protect the flooring from direct sunlight using window treatments or UV tinting on windows
- For areas without permanent HVAC
Avoid subfloors with excessive vertical movement. Optimum performance of floor covering products occurs when there is little horizontal or vertical movement of the subfloor. If the subfloor has excessive vertical movement (deflection) before installation of the flooring, it is likely it will do so after installation of the flooring is complete.
NOTE: When installing Loose Lay LVT in areas subject to direct sunlight, topical moisture, or temperature fluctuations, Bruce® Apex Pro must be used. Damage caused by water and high humidity should be addressed prior to installing Loose Lay LVT.
Loose Lay LVT is waterproof, and the structural integrity of flooring will not degrade due to contact with moisture/ water.
JOB CONDITIONS/PREPARATIONS:
- Surface Preparation: The surface must be free of dust, solvents, varnish, paint, wax, oil, grease, sealers, curing compounds, residual adhesive, adhesive removers and other foreign materials that might affect the adhesion of resilient flooring to the substrate or cause a discoloration of the flooring from below. Spray paints, permanent markers and other indelible ink markers must not be used to write on the back of the flooring material or used to mark the substrate as they could bleed through, telegraphing up to the surface and permanently staining the flooring material. If these contaminants are present on the substrate, they must be mechanically removed prior to the installation of the flooring material.
- In renovation or remodel work, remove any existing adhesive residue* so that 100% of the overall area of the original substrate is exposed.
- Temperature: LVT flooring should only be installed in temperature-controlled environments. It is necessary to maintain a constant temperature before, during and after the installation. Therefore, the HVAC system must be in operation before the installation of resilient flooring. Portable heaters are not recommended, as they may not heat the room and subfloor sufficiently. Kerosene heaters should never be used.
- Allow all flooring materials and adhesives to condition to the room temperature for a minimum of 48 hours before starting the installation.
- The area to receive the resilient flooring should be maintained at a minimum of 65° F (18° C) and a maximum of 85° F (29° C) for 48 hours before and during installation, as well as 48 hours after completion. When installing LVT, the maximum room temperature should not exceed 85° F (29° C).
- During the installation, the temperature should never rise above 85° F (29° C) for the LVT flooring. The performance of the flooring material and adhesives can be adversely affected outside this temperature range. During the service life of the floor, the room temperature should never rise above 100° F (38° C) nor fall below 55° F (13° C). The performance of the flooring material and adhesives can be adversely affected outside this temperature range.
- Testing: Conduct calcium chloride tests or percent relative humidity tests must be conducted. Bond tests should be conducted for compatibility with the substrate when using the full spread method.
- Radiant-Heated Substrates: Radiant-heated substrates must not exceed a maximum surface temperature of 85° F (29° C).
- Concrete Floors: Concrete floors should be tested for alkalinity. The allowable readings for the installation of Loose Lay LVT flooring are 5 to 9 on the pH scale.
- Use of Adhesive: Use Bruce® Apex Pro™ Adhesive in areas where the product will be subjected to direct sunlight, topical moisture, concentrated static and dynamic loads or temperature fluctuations.
ATTENTION: Mold and mildew grow only in the presence of moisture. Jobsite mold and moisture issues must be addressed and corrected prior to installation. Please visit www.epa.gov/mold for information about safely preventing and removing mold, mildew and other biological pollutants.
- Floor Flatness: The surface shall be flat to 3/16˝ in 10 ft. (3.9 mm in 3 m). Level high spots by sanding, grinding, etc. and fill low spots. Smooth surface to prevent any irregularities or roughness from telegraphing through the new flooring.
Concrete Floors:
- All concrete floors, regardless of age or grade level must be properly cured, free of excess moisture, and prepared in accordance to the most current version of ASTM F710 (Standard Practice for Preparing Concrete Floors to Receive Resilient Flooring). Below and on-grade concrete subfloors must have a suitable vapor retarder properly installed beneath the slab (ASTM E1745). The surface of concrete floors to receive resilient flooring must be dry, clean, smooth and structurally sound.
WARNING: Concrete Subfloors Containing Coal Fly Ash: Fly ash is routinely used in cement in LEED-certified projects. Installing floors on concrete substrates containing coal fly ash can be problematic and therefore may require aggressive scarification or shot blasting prior to installation of flooring materials. Perform bond test prior to the installation of Loose Lay LVT flooring if coal fly ash has or may have been used.
- Concrete PSI: Concrete substrates must have compression strength of 3,000 psi or greater.
- Expansion Joints / Isolation Joints: Such joints (or other moving joints) are incorporated into concrete floor slabs in order to permit movement without causing random cracks in the concrete. These joints must be honored and not be filled with underlayment products or other materials, and floor coverings must not be laid over them.
- Treating Surface Cracks: Cracks, grooves, depressions, control joints, or other non-moving joints, and other irregularities shall be filled or smoothed with high-quality Portland cement-based patching or underlayment compounds for filling or smoothing or both. Some surface cracks may need to be chased and filled. Patching or underlayment compound must be moisture, mildew and alkali-resistant, and must provide a minimum of 3,000 psi compressive strength after 28 days, when tested in accordance with Test Method ASTM C109 or ASTM Test Method C472, whichever is appropriate. Refer to manufacturer’s instructions of such subfloor preparation materials for more details.
- Concrete Compressive Strengths: Because of traffic loads anticipated for commercial and institutional environments, concrete slabs should meet the requirements for ACI* Class 2 or Class 4 floors.
WARNING: Do not lightly skim-coat highly polished or slick, power-troweled concrete surfaces. A thin film or residue of floor patch will not bond sufficiently to a slick subfloor and may become a bond breaker, causing tiles to release at the interface of the subfloor and patching material
Lightweight Concrete:
- The minimum density of lightweight concrete should be greater than 90lbs. per cubic foot, with minimum compression strength of 2,500 psi or greater. Some concrete slabs may require higher dynamic and static loads and should be designed to accommodate these requirements. Lightweight concrete or gypsum substrates may need to be primed prior to the installation of flooring. Contact the subfloor preparation manufacturer for recommendations, and always perform a bond test before proceeding.
- Because lightweight concrete can retain significant amounts of moisture within the slab, the lightweight floors should be tested in accordance with ASTM F2170. Do not use ASTM F1869 test method, as this method does not indicate moisture deep in the concrete slab.
Tile, Terrazzo, Asbestos Tile, Resilient Tile, and Non-Cushion Sheet Vinyl:
- Existing floors must be firmly attached to the structural floor. They must be clean, smooth, dry, structurally sound and flat within 3/16˝ within a 10-foot radius with no abrupt height differences.
- The substrate should not slope more than 1˝ per 6´ in any direction. Fill all grout joints on ceramic tiles, terrazzo, quarry tiles and similar floors with a leveling and patching compound.
Underlayment Panels:
Underlayments for resilient flooring must be:
- Structurally sound
- Specifically designed and warranted for resilient flooring
- A minimum of 1/4˝ (6mm) thick
- Of a smooth surface, so as to prevent telegraphing
- Able to resist indentations
- Free of any substances that may cause flooring to stain
AHF Products is NOT responsible for:
- Joint or texture show-through
- Tunneling and ridging over underlayment joints
- Discoloration from stain sources in the panel, regardless of the type of underlayment panel used
- Underlayment panel problems caused by local climate conditions, basement wall and subfloor construction, or improper installation.
We strongly suggest that you secure a written guarantee and installation instructions from the supplier or manufacturer of the underlayment board being used.
Plywood:
Use only American Plywood Association (APA) rated underlayment grade plywood, with a minimum grade of “BB” or “CC”, and minimum 1/4˝ thickness. Allow expansion spacing between plywood butt joints of 1/32˝–1/16˝ or follow manufacturer’s instructions. When installing underlayment, stagger cross-joints 4´ on an 8´ panel (minimum 16˝), lightly butt the panels, and set fasteners flush or slightly below the surface level of the underlayment. Fill underlayment seams, nail holes and any indentations with an approved Portland Cement-type floor patch; allow recommended drying time and sand the patch until smooth; otherwise, use manufacturer-certified poplar, birch, and spruce plywood underlayment, with a fully sanded face and exterior glue.
All dust must be COMPLETELY removed to ensure a strong adhesive bond. Vacuum or sweep thoroughly, then apply adhesive.
Lauan Plywood:
Use only Type 1 lauan exterior grade “BB” or “CC” for underlayment. The use of lesser grades of lauan plywood is unacceptable and may cause severe problems when used as an underlayment, including discoloration, indentation, loss of bond and delamination.
NOTE: The use of lauan plywood and other extremely porous wood underlayments will reduce the flash and working time of adhesives. It is best to apply an acrylic-based primer-sealer to any porous substrate prior to installing LVT. A manufacturer’s certification of lauan grade must accompany any claim involving the use of a lauan underlayment.
Raised Access Panels:
Inspect the subfloor thoroughly. The access panels should be structurally sound, smooth, level, clean, dry and free of any foreign loose matter or defects. The raised panels should meet the following standards:
- The entire raised access floor must be clean, smooth, dry, structurally sound, and flat within 3⁄16˝ within a 10-foot radius with no abrupt height differences.
- Gaps between panels should not exceed .04˝ (1 mm).
- Lipping of panels and the height differences between adjacent panels should not exceed .03˝ (.0.75 mm).
Metal Substrates:
- Loose Lay LVT flooring may be installed directly over steel, stainless steel, aluminum and lead substrates using the appropriate adhesive. These types of substrates must be thoroughly cleaned, dried and free of dust, dirt, wax, paint, grease, or any other contaminates that may interfere with the adhesive bond. The surface may require cleaning with mineral spirits to remove oil or grease prior to abrading or lightly sanding the surface to achieve a satisfactory bond.
- A bond test should be performed prior to installation. Metal substrates require the non- porous application method.
Polymeric Poured Floors:
- These type of floors are generally two-part, resin-based, epoxy paints or coatings. It’s very difficult to tell whether or not they are well bonded to the substrate and are subject to issues with excessive moisture. It is therefore recommended that polymeric poured floors be removed so as to avoid potential problems.
LAYOUT:
- Layout shall be specified by the architect, designer or end user (refer to architectural drawings).
- Custom LVT installations will use the same layout procedures as standard LVT installations; however, they may require some adjustments once the initial layout is completed. Additional lines may be needed depending on the design of the floor. Once the final layout is determined, the starting point may not necessarily be in the corner or the center of the room. The starting point may be adjusted so that the installation of the design is more easily completed. An example would be to install an inset first and then install the field around the inset, which would ensure proper placement of the inset. It is important that when using this procedure, enough time is allowed for the adhesive to set, whereby any pressure will not cause slipping or shifting of the tile.
INSTALLATION:
- Loose Lay LVT should be the last material installed, so as to prevent other trades from disrupting the installation and adhesive set-up, and to prevent damage to the floor.
- Loose Lay LVT comes in plank, rectangular, and square tile formats. Install tiles running in the same direction (block or staggered), quarter-turned or as specified by architect. Loose Lay LVT plank flooring should have end-joints offset by at least 6˝ and should be installed in a staggered manner, so as to create a random appearance that avoids alignment of end-joints. Loose Lay LVT can be laid out to run either parallel or diagonal to the room or primary wall. The following conditions must be given consideration when determining how AHF LVT will be installed:
- Before installing the material, plan the layout so tile joints fall at least 6˝ (15.24 cm) away from subfloor/underlayment joints. Do not install over expansion joints.
- Determine which direction the planks/tiles will run. Find the center of each of the end walls (the walls perpendicular to the long dimension of the planks/tiles) and place a pencil mark on the floor. Connect these points by striking a chalk line down the center of the room. Do a dry layout of planks/tiles from the center line to the wall running parallel to the long direction of the planks/tiles to determine the width of the last row of planks/tiles. (Fig 1).
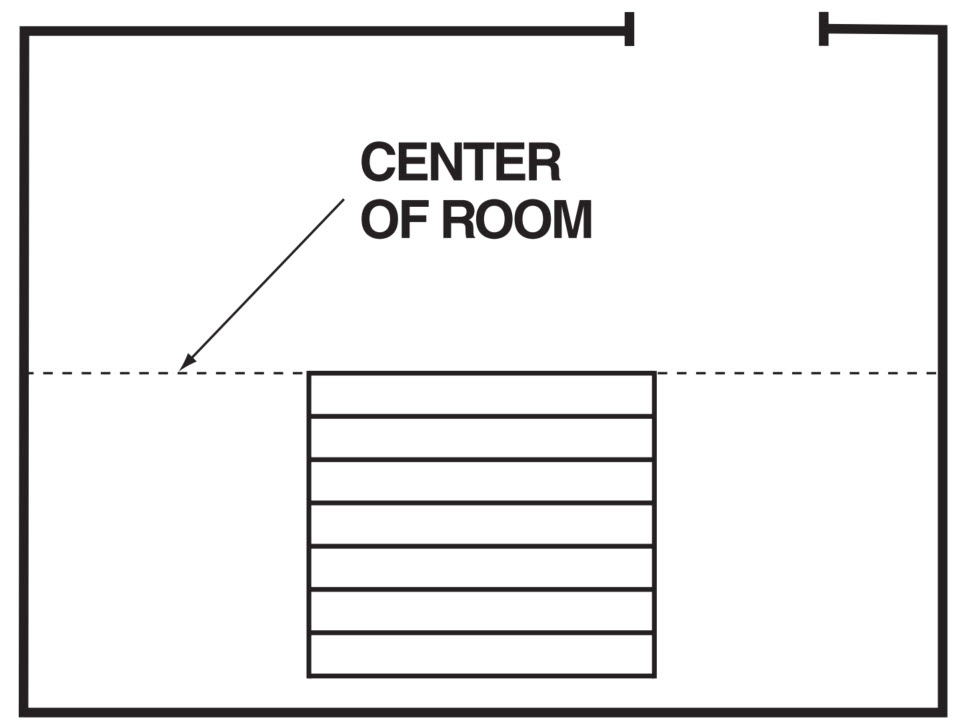
- Avoid having border pieces less than half the width of the size plank/tile that is being installed. If you find the border planks/tiles will be less than half the width of the plank/tile, the center starting line should be shifted a distance equal to half the plank/tile width. This method will balance the room and provide for a larger cut piece at the wall.
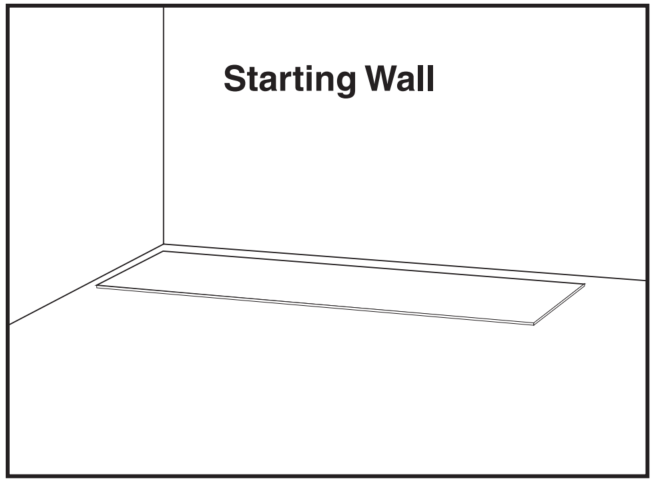
- Install the product from left to right in the room. (Fig. 2). Ensure the planks/tiles are installed tight to the walls and any vertical obstructions. All edges and ends of the planks/tiles should meet flush and have a tight fit.
- In spaces where the room does NOT exceed 215 sq. ft., LVT can be installed without adhesive. The planks or tiles should be cut tight to all walls and vertical obstructions. Install the planks or tiles along the chalk lines and repeat until the installation has been completed. As previously stated above, base cabinets should not be installed on top of the planks or tiles. For larger spaces see the full spread adhesive installation procedure.
- The end joints should be staggered a minimum of 6˝ (15.24 cm) apart.
- For all installations, open several cartons and mix them as they are installed to help blend any slight shade differences from one carton to the next.
- Wood door casings should be undercut so that LVT will fit neatly beneath them. Position the plank/tile on the substrate against the door casing. Lay the handsaw flat against the scrap plank/tile and carefully cut the door casing to the height of the plank/tile. Cut around metal door casings, do not cut metal door casings.
Use Adhesive Bruce® Apex Pro™ in areas where the LVT product will be subjected to direct sunlight, topical moisture, concentrated static and dynamic loads or temperature fluctuations.
| Adhesive | Set in wet | Dry to touch | Trowel |
| BondLink 99% RH 12lbs-MVER | 20-30 minutes | 30-60 minutes | Porous: 1/16˝ x 1/16˝ x 1/16˝ (1.6 x 1.6 x 1.6 mm) Sq. Notch Non-Porous: 1/16˝ x 1/32˝ x 1/32˝ (1.6 x .8 x .8 mm) U-notch |
| Apex Pro No moisture test needed | 10 minutes | N/A | Notch: 1/16˝ x 1/32˝ x 1/32˝ (1.6 x .8 x .8 mm) U-notch |
NOTE: Allowing the proper open time will help to minimize tile shifting. The amount of open time will vary according to job conditions — temperature, humidity, air flow and type of substrate.
- Stagger end joints by 6˝ and cut pieces at end of row should be 12˝ or greater. Continue installing the remaining rows in similar fashion. Maintain the 6˝ minimum, staggering end joints between rows. After you have enough rows in place, you may find it easier to turn around and work on top of the newly installed planks/tiles for the remainder of the room. LVT is designed to be installed without adhesive in areas up to a maximum of 215 sq. ft. (20 m2), except for areas that are subject to substantial temperature fluctuations or very high traffic (including heavy rolling-loads). In this case a permanent full bond installation method is required.
- NOTE: After the first 3 rows of planks/tiles are installed, they should be checked with a string line to ensure the rows are still running straight. If they are not, it could be that the starting wall has some irregularities that caused bowing in the installation. If so, the starting row of planks/tiles may have to be scribed and re-trimmed to account for any unevenness in the wall.
- Measure and cut fill pieces perfectly net as to not leave an expansion space or force fit into position.
- For raised access systems over 215 sq. ft. (20 m2), contact AHF Customer Service for recommended adhesives
- In all areas, larger than 215 sq. ft. (20 m2), and areas subject to substantial temperature fluctuations or very high traffic, LVT must be installed using the permanent full bond installation method. See Full Spread Installation procedure below.
- One key factor to ensuring an excellent finished appearance of LVT is careful substrate preparation. The suitability and application of substrate preparation materials must be in strict accordance with the manufacturer’s instructions. All warranties and guarantees pertaining to the suitability and performance of any preparation or ancillary product rests with that material manufacturer or the flooring contractor and NOT with AHF Products. The condition of the substrate and bond issues resulting from the use of non-recommended, improper, or incorrectly prepared adhesive, sealers, embossing, levelers, patches, concrete, gypsum-based products and other such items, are the sole responsibility of the flooring contractor, general contractor, and/or manufacturer of the particular product.
- Special Situations: When installing thinner gauge material next to thicker gauge material, install thicker material first and then butt a 12˝ (30.5 cm) wide piece of scribing felt against the thicker material. Adhere the scribing felt to the subfloor with the proper adhesive. Use cement-based patch to feather the edge of the scribing felt to the level of the substrate. Allow the patch to dry completely before installing the flooring. Scribing felt is not recommended to be used under the entire installation.
Full Spread Installation Procedure: Dry-to-touch method
- Line off entire area to be installed. Move the chalk lines to the corner or end of the room farthest from the doorway. These lines should be 2´ or 3´ from the wall depending on your reach (Fig. 3)
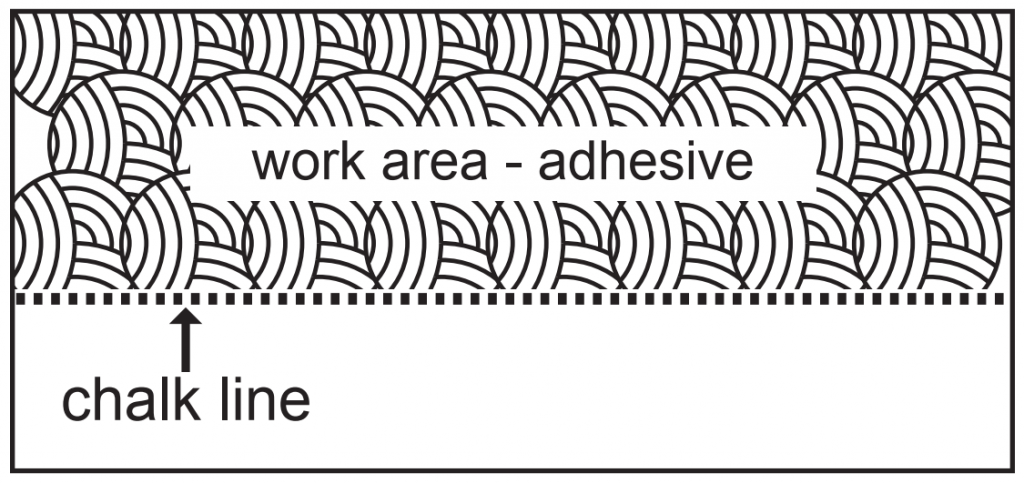
- Apply the adhesive over the area, being careful not to cover the chalk lines.
- You may prefer to install one quarter of the room at a time by starting in the center of the room (refer to Layout section for layout instructions).
- Allow the adhesive to set until dry-to-touch, following the recommended open time. To test, press your thumb lightly on the surface of the adhesive in several places. If the surface feels slightly tacky as your thumb is drawn away and does not stick to your thumb, the adhesive is ready for installation.
- Install the tile along the chalk lines.
- Immediately remove any adhesive from the surface of the flooring using a clean, white cloth dampened with a neutral detergent and water. Roll the tile in both directions within 30 minutes after installation using a 100-lb. roller.
Installation Keys
| Substrate Flatness Tolerances | 3⁄16˝ in 10´ with no abrupt height differences. Slope no more than 1˝ in 6´ |
| Is Underlayment (Pad) Required? | Not Required |
| Acclimation Requirements | Minimum 48 hours |
| Transition Requirements (T-Mold) for Large Spaces | Not Required |
| Transition Requirements (T-Mold) Doorways/ Thresholds | Not Required |
| Installation Over Existing Ceramic Tile Floor | Filling grout joints required. Follow subfloor flatness tolerances. |
| Subfloor RH/MVER Recommendations | 85% RH, 8lbs. MVER |
| Radiant Heat | Approved – Substrate surface temperature not to exceed 85°F (29°C) |
| Required Interior Environmental Conditions | Interior environmental conditions must be maintained at 65°-85°F (18°-27°C) and 35%-85% RH a minimum of 48 hours before testing, and at all times during testing (ASTM F710). |
| Definition of “Waterproof” | Structural integrity of flooring will not degrade due to contact with moisture/water. |
INSPECT THE WORK:
- Inspect your workmanship. Was the floor properly rolled into the adhesive as required for most products? Check for loose edges or seams and correct as necessary. Are there trapped air blisters, buckles, dirt, or debris particles under the flooring? Is there adhesive on the surface? Take care of any problems immediately.
- By inspecting the completed installations, you often avoid future problems by making minor adjustments to your installation techniques, such as adjusting adhesive open times, proper trowel notching, conditioning the material, or subfloor preparation.
FINISHING THE JOB:
- Replace any molding. Nail the molding to the wall surface (not through the flooring). At doorways and at other areas where it may meet other flooring surfaces, it is preferable to use a trim to cover the exposed edge but not pinch the planks/tiles. Leave a gap between the planks/tiles and the adjoining surface.
- Once installed, protect your LVT floors from heavy rolling loads, other trades and appliances by using sheets of plywood or MDF.
- When replacing appliances, or whenever moving heavy furniture over the flooring, place a wood panel under the object. Without moving the panel, slide or roll the object over it. Follow with additional panels as needed. This prevents scratches, tears or buckling of the flooring material.
CLEAN-UP:
- The most obvious consideration in clean-up is trash and waste product removal. Tools, equipment, adhesives or any chemicals that may present safety hazards should be properly stored or disposed of. Be alert to such materials and conditions when other trades are working in the same area and in occupied homes. Keep all walkways, work areas, stairways and doorways free of obstruction or trash. In residential work, remove all items except for a few square yards of material in case repair insets are needed in the future.
- Check surrounding walls, cabinets and fixtures for adhesive smears or accidental damage that may have occurred during the installation. Correct as necessary, and show the owner any conditions that require further attention by plumbers, electricians, etc.
PROTECT THE FLOOR:
Traffic, Dirt and Discoloration:
- In new construction, you may provide a protective covering of plain, undyed kraft paper in high traffic areas to guard against damage to the new floor. Be sure the covering does not contain any inks, markings, or other agents that could stain the new floor. AHF Products does not recommend the use of mats or rugs with rubber or latex backings since they may cause permanent discoloration. Protect all products from the direct flow of heat from hot-air registers, radiators, or other heating fixtures or appliances.
Moving Heavy Appliances and Equipment:
- When moving heavy or sharp objects (such as appliances) over resilient flooring installations, place a wood panel under the object. Without moving the panel, slide or roll the object over it. Follow with additional panels as needed.
- This prevents scratches, tears, or buckling of the flooring material.
- Before moving wheeled or castered objects over newly adhered flooring, use wood panels to protect the floor by distributing the load. Otherwise, permanent wheel tracking could develop in the flooring, caused by movement in the fresh adhesive. We recommend protecting the resilient flooring with wood panels whenever heavy objects are moved across it.
- On residential installations, it is especially important for the installers to move appliances whenever possible. If this cannot be done on new construction work, you must instruct the responsible persons about the precautions for moving heavy appliances and furnishings.
- Newly installed commercial flooring should not be exposed to routine rolling load traffic (carts, lifters, etc.) for at least 72 hours after installation to allow setting and drying of adhesives. If rolling loads cannot be avoided, protect the newly installed commercial flooring for 72 hours after installation by covering with wood panels. Equip table and chair legs with floor protectors to minimize scratches and indentations.
- Take care to prevent damage to resilient flooring by wheeled vehicles, castered furniture, and appliances and dollies. Wheels or casters should have widths and diameters suitable for the loads to be carried. This will reduce rolling resistance and minimize or eliminate the risk of cutting or permanently indenting the flooring.
NOTE: Since rolling-type casters and certain feet on furniture, and appliances may damage resilient flooring, any warranty as to their suitability rests with the furniture or appliance manufacturer.
Guidelines for Floor Protection Devices (furniture feet, rests, casters, wheels, etc.):
- The contact area should be smooth and flat to provide full contact and be free of small protrusions, irregularities, roughness, depressions, mold lines, embedded dirt, grit etc.
- The contact area should be large enough to distribute the load evenly without damaging the floor.
- All edges should be slightly rounded to prevent damage if briefly turned on edge.
- Floor contact devices should be manufactured from non-staining materials.
- Floor contact devices should be properly maintained. Worn, damaged and missing devices should be replaced.
- Furniture, appliances, equipment, etc. should be properly leveled so that all floor contact devices rest fully and firmly on the floor at all times.