
A. INTRODUCTION
A material estimate is a list of the quantities of materials, sundries and accessories necessary for completely installing resilient flooring in a given area according to the specifications. This is not to be confused with a cost estimate, which would include the labor, trucking and overhead. In order to prepare an accurate estimate, you will need a diagram of the area and knowledge of the material to be installed in that area.
Flooring dealers use many methods of estimating. The following method of estimating is a basic method for new installers and salespeople in the industry. Outlined below are recommended guidelines:
- Estimate flooring material required from an accurate sketch or blueprint.
- Check dimensions and date the estimate to correspond with the date of the sketch.
- Figure all sheet flooring in 6′ and 12′ widths.
- Avoid cross seams wherever possible.
- Resilient tile is estimated on the square footage of the area and then converted into the number of cartons of tile.
You should have all necessary measurements and information in the form of a sketch or blueprint, including accurate dimensions. If accurate dimensions are not given, you will need to measure the job. Mark dimensions on the sketch or blueprint with a brief note explaining the origin. This places the responsibility for the accuracy of the measurements on the person measuring the job. Whenever possible, the dealer should measure the job.
When measuring any job, be sure to check both sides of the room, as well as both ends. This will show any variation in the squareness of the room and eliminate trouble arising when the material is cut and ready to install. If any person other than the dealer has measured the job, make allowances for inaccuracies.
B. ESTIMATING/INSTALLATION CHECKLIST
- Condition of Room.
- Existing floor (tile, inlaid, rotovinyl, paint, etc.)
- Removal
- Embossing leveler
- Repairs
- Number of layers
- Subfloor
- Resilient floor (smooth, embossed, cushioned)
- Hardboard
- Plywood
- Concrete
- Particleboard
- Other
- Existing floor installation system
- Full-Spread
- Securabond
- Interflex or perimeter bonded
- Loose-lay
- Modified loose lay
- Wall base or quarter-round molding
- Color
- Removal
- Replacement
- Metal in doorways
- Color
- Removal
- Replacement
- Damage
- Swelling or buckling of underlayment
- Water damage, i.e., dishwater leak
- Delamination
- Cut and gouges
- Peaked seams
- Discoloration
- Asphalt from driveway sealer
- Rubber-backed throw rugs/mats
- Crocking from carpet in another room
- Mold or mildew
- Maintenance problem
- Fading from excessive sunlight
- Condition of area to be installed
- Radiant heat (cannot exceed 85° F) (29° C)
- Sleeper-construction
- Dampness of concrete (conduct a Bond and Moisture Test; a Calcium Chloride test may also be conducted)
- Mildew under cardboard boxes
- White salt (alkali) at tile joints
- Unusual traffic/wear pattern
- Furniture
- Roller casters, slides or sharp edges on the chair and table legs
- Floor protectors needed
- Existing floor (tile, inlaid, rotovinyl, paint, etc.)
- Installation of Flooring
- Refrigerator
- Ice maker (disconnect)?
- Who will move?
- Are wood panels available?
- On wheels or slide (adjustable)?
- Will it fit through door of room?
- Will it fit back under wall cabinet after new flooring is installed?
- Stove
- Gas or electric (disconnect)?
- Who will move?
- Are wood panels available
- Is there a gas shut-off valve?
- If electric, does it have a plug connector or is it wired directed? (contact electrician for direct-wired stove)
- Portable dishwasher
- Are the casters large enough to prevent damage to new floor?
- Are wood panels available?
- How far must it be moved for normal use?
- Toilet
- Who will remove and reinstall?
- Will wax ring be needed?
- Underlayment boards
- How much will the installation of underlayment raise the floor?
- Sliding, pocket or swing doors? (Do the doors have to be cut and who will cut?)
- New resilient floor
- How many seams? (run seams the shortest distance and perpendicular to light sources)
- Can you carry 12′ material into the house?
- Does the material end at a threshold?
- Who will furnish adhesives?
- What adhesives, sealers or seam coatings are required?
- Which installer is qualified/ knowledgeable enough to do this job?
- Special tools required (sanders, grinders, etc.)
- New construction
- When will the job be ready for floor installation?
- Heat and electricity?
- What will be needed to protect floor from other trades? (Who will provide?)
- Is water available?
- Clean-up
- Is dumpster required for debris removal?
- Who will clean up?
- Who will remove debris?
- Refrigerator
C. READING BLUEPRINTS
When making a material estimate, take accurate measurements of the area or take the measurements from accurate sketches or blueprints.
Scales on most blueprints are 1/8″, 1/4″ or 1/2″ equals one foot. To determine a material estimate from a blueprint, you need an architect’s scaled rule, sometimes called a triangular scale. Although a few blueprints may contain complete measurements, you may need to make some measurements using a scaled rule. All areas measured by a scaled rule should be checked against the entire length or width of the building. Blueprint paper can shrink slightly. When using a 1/2″ scale, there will be little or no difference. When using a 1/8″ scale, shrinkage can cause a difference of several inches. Always work from given dimensions when they are shown on the blueprints.
One of the blueprint pages denotes the type of floor covering to be installed in each room of the building. This page normally precedes the actual drawings and is called the room finish schedule, legend or key code sheet. Check this sheet closely to determine the exact areas where resilient floor coverings are to be installed. Many times various types of resilient floor coverings will be installed on the same floor or different floors of a building. Then, read the architect’s specification book that details the exact materials to be installed, how the installation is to be made, what protection the floor must have after the installation, etc. If the floor must be protected after installing, you might have to estimate the cost of using building paper to protect the finished installation of resilient flooring while other trades are still working.
In many cases the same blueprint will refer to two, three or more floors if they are identical in structure and in the resilient floor covering to be used. The number of floors involved is always marked on the blueprint. In this instance, one of the easiest methods of checking an estimate of resilient floor covering is to take the width and length of the building, figure the amount of square yardage or square footage necessary and multiply by the number of floors to be installed. All partitions taking up space in the area would be considered as waste.
Here are some additional points to remember when reading blueprints and estimating costs of installing a job:
- Determine whether any changes have been incorporated into the specifications.
- Carefully examine the specifications for the type of material to be estimated.
- Determine if concrete floors have sealers or curing agents applied that will need to be removed. This should be on the schedule.
- If the building is not new construction, you will need to know if old flooring and/or adhesive must be removed. This should be on the schedule.
- Check to determine if all drawings are included in the set of plans.
- If you must use an elevator, find out if there is a charge for using it.
- Determine if there is a charge for using electricity, heat and water.
- Find out if blow torches and flammable solvents are allowed on the job.
- Carefully determine if the finished floor must be covered.
D. ESTIMATING SHEET FLOORS
- Nonpatterned Sheet Floors
Estimate sheet floors by calculating the number of strips necessary, not the square yardage of the area. Be sure to consider the overlap needed for seams when making this calculation. If the material does not have a pattern match, make the strips 3″ longer than the length of the room to allow 1 1/2″ on each end for fitting.
When you have estimated the number of strips of material and the lineal footage needed, convert it to square yards. This is necessary for adhesive estimates and also because the material is priced by the square yard. Using the procedure above for a room 15′ 9″ x 11′ 6″, you would need two sheets, each 16′ long (32′ total).
Each lineal (running) foot of 6′-wide material is equal to 2/3 sq yd. To calculate the square yardage, simply take 2/3 times the lineal footage. If you have a calculator, divide by 3 and multiply by 2. In the example above, 32′ would be equal to 21.3 sq yd. - Patterned Sheet Floors
When estimating patterned sheet floors, allow for adjusting the two pieces so the pattern will be matched at the seam. Some Armstrong Flooring patterns are installed trademark edge to nontrademark edge (do not reverse edges), while others are installed trademark edge to trademark edge (reverse edges). There are two simple rules for these procedures that will work for most installations. Very complicated installations, without a common wall, may need to be laid out on a scale drawing to make an estimate.
Armstrong Flooring’s advertised pattern match is the actual repeat of the pattern. Armstrong Flooring also lists an economy match for most pattern materials. The economy match may also be used for estimating the material needed for the installation. The drop match is where the design repeats across the sheet and is only used when a cross seam is necessary. When a design has an economy match, the pattern can be matched at something less than the repeat and therefore uses less installation material.
- Nonreversed edges (TM edge to non-TM edge)
- Cut the first piece the size of the room plus 3″.
- Cut the rest of the pieces the size of the room, plus 3″, and go to the next multiple of the match.
Using the procedure previously mentioned for a room 15′ 9″ x 11′ 6″, the first piece would be cut 16′. If the pattern match was 18″, there would be a multiple of the match every 18″ or 1 1/2′. The multiples would be 1 1/2′, 3′, 4 1/2′, 6′, 7 1/2′, 9′, etc. If you kept adding 18″, you would find 16′ 6″ is the next multiple of 18″.
Cut the second piece 16′ 6″ which would allow enough material to match to the first 16′ first piece. Adding the 16′ piece to the 16’6″ piece produces a total length of 32’6″. Multiply the 32′ 6″ by 2/3 (divide by 3 and multiply by 2) for a total of 21.6 sq yd.
The match multiple chart makes it very easy for you to figure the multiple of matches. Find the match at the top of the chart and as you move down the column there will be an “x” at each multiple of that repeat. The lengths are on the left. With an 18″ match you can follow the 18″ column down the table and there is an “x” at 1′ 6″, 3′, 4′ 6″, etc.
- Reversed edges (TM edge to TM edge)
- Cut the first piece the size of the room plus 3″.
- Cut the rest of the pieces the size of the room, plus 3″, plus the match length.
Using this procedure for a room 15’9″ x 11’6″, the first piece would be cut 16′. If the pattern match was 18″, you would need to add 18″ or 1-1/2′ for the second piece which would be 17’6″. Adding the 16′ piece to the 17’6″ piece produces a total length of 33’6″. Multiple 33’6″ by 2/3 (divide by 3 and multiple by 2) for a total of 22.3 sq yd.
The match multiple chart should NOT be used when estimating patterns that require the edges to be reversed.
3. Cross Seams
Cross seams are conspicuous and unsightly. Avoid them whenever possible. If a patterned sheet flooring is being estimated and a cross seam cannot be avoided, be sure to allow extra material for matching. Add slightly more than half the length of the repeat of the design to each piece of material to be cross seamed. This gives a little more than the full repeat between the two halves after the piece has been cut, plus from 1″ to 3″ of material for fitting at the wall lines.
4. Quick Inventory
A quick inventory of 6′ roll goods can be taken by measuring in inches the diameter of the core. Add to this the outside diameter (in inches) of the roll. Multiply this sum by the number of laps of goods in the roll. Then multiply the total by .0872. The result will be the number of square yards in a roll. If you want the number of lineal feet in the roll, multiply by .131 instead of .0872.
Estimating 2 Meter (6′ 7″) Sheet Flooring
| Lineal inches | Square feet | Square yards |
| 1 | 0.54 | 0.06 |
| 2 | 1.08 | 0.12 |
| 3 | 1.63 | 0.18 |
| 4 | 2.17 | 0.24 |
| 5 | 2.71 | 0.30 |
| 6 | 3.25 | 0.36 |
| 7 | 3.79 | 0.42 |
| 8 | 4.33 | 0.48 |
| 9 | 4.88 | 0.54 |
| 10 | 5.42 | 0.60 |
| 11 | 5.96 | 0.66 |
| Lineal feet | Square feet | Square yards |
| 1 | 6.5 | 0.72 |
| 2 | 13.0 | 1.44 |
| 3 | 19.5 | 2.17 |
| 4 | 26.0 | 2.89 |
| 5 | 32.5 | 3.61 |
| 6 | 39.0 | 4.33 |
| 7 | 45.5 | 5.06 |
| 8 | 52.0 | 5.78 |
| 9 | 58.5 | 6.50 |
| 10 | 65.0 | 7.22 |
| 11 | 71.5 | 7.94 |
| 12 | 78.0 | 8.67 |
| 13 | 84.5 | 9.39 |
| 14 | 91.0 | 10.11 |
| 15 | 97.5 | 10.83 |
| 16 | 104.0 | 11.56 |
| 17 | 110.5 | 12.28 |
| Lineal feet | Square feet | Square yards |
| 18 | 117.0 | 13.00 |
| 19 | 123.5 | 13.72 |
| 20 | 130.0 | 14.44 |
| 21 | 136.5 | 15.17 |
| 22 | 143.0 | 15.89 |
| 23 | 149.5 | 16.61 |
| 24 | 156.0 | 17.33 |
| 25 | 162.5 | 18.06 |
| 26 | 169.0 | 18.78 |
| 27 | 175.5 | 19.50 |
| 28 | 182.0 | 20.22 |
| 29 | 188.5 | 20.94 |
| 30 | 195.0 | 21.67 |
ESTIMATING PATTERNED SHEET MATERIALS -Match Multiple Charts
| Piece Length | Piece Length | Repeats and Matches | Repeats and Matches | Repeats and Matches | Repeats and Matches | Repeats and Matches | Repeats and Matches |
| FEET | INCHES | 4.5″ | 9″ | 13.5″ | 18″ | 27″ | 54″ |
| 0 | 4.5 | x | |||||
| 0 | 9 | x | x | ||||
| 1 | 1.5 | x | x | ||||
| 1 | 6 | x | x | x | |||
| 1 | 10.5 | x | |||||
| 2 | 3 | x | x | x | x | ||
| 2 | 7.5 | x | |||||
| 3 | 0 | x | x | x | |||
| 3 | 4.5 | x | x | ||||
| 3 | 9 | x | x | ||||
| 4 | 1.5 | x | |||||
| 4 | 6 | x | x | x | x | x | x |
| 4 | 10.5 | x | |||||
| 5 | 3 | x | x | ||||
| 5 | 7.5 | x | x | ||||
| 6 | 0 | x | x | x | |||
| 6 | 4.5 | x | |||||
| 6 | 9 | x | x | x | x | ||
| 7 | 1.5 | x | |||||
| 7 | 6 | x | x | x | |||
| 7 | 10.5 | x | x | ||||
| 8 | 3 | x | x | ||||
| 8 | 7.5 | x | |||||
| 9 | 0 | x | x | x | x | x | x |
| 9 | 4.5 | x | |||||
| 9 | 9 | x | x | ||||
| 10 | 1.5 | x | x | ||||
| 10 | 6 | x | x | x | |||
| 10 | 10.5 | x | |||||
| 11 | 3 | x | x | x | x | ||
| 11 | 7.5 | x | |||||
| 12 | 0 | x | x | x | |||
| 12 | 4.5 | x | x | ||||
| 12 | 9 | x | x | ||||
| 13 | 1.5 | x | |||||
| 13 | 6 | x | x | x | x | x | x |
| 13 | 10.5 | x | |||||
| 14 | 3 | x | x | ||||
| 14 | 7.5 | x | x | ||||
| FEET | INCHES | 4.5″ | 9″ | 13.5″ | 18″ | 27″ | 54″ |
| 15 | 0 | x | x | x | |||
| 15 | 4.5 | x | |||||
| 15 | 9 | x | x | x | x | ||
| 16 | 1.5 | x | |||||
| 16 | 6 | x | x | x | |||
| 16 | 10.5 | x | x | ||||
| 17 | 3 | x | x | ||||
| 17 | 7.5 | x | |||||
| 18 | 0 | x | x | x | x | x | x |
| 18 | 4.5 | x | |||||
| 18 | 9 | x | x | ||||
| 19 | 1.5 | x | x | ||||
| 19 | 6 | x | x | x | |||
| 19 | 10.5 | x | |||||
| 20 | 3 | x | x | x | x | ||
| 20 | 7.5 | x | |||||
| 21 | 0 | x | x | x | |||
| 21 | 4.5 | x | x | ||||
| 21 | 9 | x | x | ||||
| 22 | 1.5 | x | |||||
| 22 | 6 | x | x | x | x | x | x |
| 22 | 10.5 | x | |||||
| 23 | 3 | x | x | ||||
| 23 | 7.5 | x | x | ||||
| 24 | 0 | x | x | x | |||
| 24 | 4.5 | x | |||||
| 24 | 9 | x | x | x | x | ||
| 25 | 1.5 | x | |||||
| 25 | 6 | x | x | x | |||
| 25 | 10.5 | x | x | ||||
| 26 | 3 | x | x | ||||
| 26 | 7.5 | x | |||||
| 27 | 0 | x | x | x | x | x | x |
| 27 | 4.5 | x | |||||
| 27 | 9 | x | x | ||||
| 28 | 1.5 | x | x | ||||
| 28 | 6 | x | x | x | |||
| 28 | 10.5 | x | |||||
| 29 | 3 | x | x | x | x | ||
| FEET | INCHES | 4.5″ | 9″ | 13.5″ | 18″ | 27″ | 54″ |
| Piece Length | Piece Length | Repeats and Matches | Repeats and Matches | Repeats and Matches | Repeats and Matches | Repeats and Matches | Repeats and Matches |
| Piece Length | Piece Length | Repeats and Matches | Repeats and Matches | Repeats and Matches | Repeats and Matches |
| FEET | INCHES | 7.88″ | 9.84″ | 19.69″ | 39.38″ |
| 0 | 7-3/4 | x | |||
| 0 | 9-13/16 | x | |||
| 1 | 3-3/4 | x | |||
| 1 | 7-11/16 | x | x | ||
| 1 | 11-5/8 | x | |||
| 2 | 5-12 | x | |||
| 2 | 7-1/2 | x | |||
| 3 | 3-3/8 | x | x | x | x |
| 3 | 11-1/4 | x | |||
| 4 | 1-3/16 | x | |||
| 4 | 7-1/8 | x | |||
| 4 | 11-1/16 | x | x | ||
| 5 | 3 | x | |||
| 5 | 8-7/8 | x | |||
| 5 | 10-7/8 | x | |||
| 6 | 6-3/4 | x | x | x | x |
| 7 | 2-5/8 | x | |||
| 7 | 4-9/16 | x | |||
| 7 | 10-1/2 | x | |||
| 8 | 2-7/16 | x | x | ||
| 8 | 6-3/8 | x | |||
| 9 | 1/4 | x | |||
| 9 | 2-1/4 | x | |||
| 9 | 10-1/8 | x | x | x | x |
| 10 | 6 | x | |||
| 10 | 7-15/16 | x | |||
| 11 | 1-7/8 | x | |||
| 11 | 5-13/16 | x | x | ||
| 11 | 9-3/4 | x | |||
| 12 | 3-5/8 | x | |||
| 12 | 5-5/8 | x | |||
| 13 | 1-1/2 | x | x | x | x |
| 13 | 9-3/8 | x | |||
| 13 | 11-5/16 | x | |||
| 14 | 5-1/4 | x | |||
| 14 | 9-3/16 | x | x | ||
| 15 | 1-1/8 | x | |||
| 15 | 7 | x | |||
| 15 | 9 | x | |||
| FEET | INCHES | 7.88″ | 9.84″ | 19.69″ | 39.38″ |
| 16 | 4-7/8 | x | x | x | x |
| 17 | 3/4 | x | |||
| 17 | 2-11/16 | x | |||
| 17 | 8-5/8 | x | |||
| 18 | 9/16 | x | x | ||
| 18 | 4-1/2 | x | |||
| 18 | 10-3/8 | x | |||
| 19 | 3/8 | x | |||
| 19 | 8-1/4 | x | x | x | x |
| 20 | 4-1/8 | x | |||
| 20 | 6-1/16 | x | |||
| 21 | 0 | x | |||
| 21 | 3-7/8 | x | x | ||
| 21 | 7-13/16 | x | |||
| 22 | 1-3/4 | x | |||
| 22 | 3-11/16 | x | |||
| 22 | 11-9/16 | x | x | x | x |
| 23 | 7-7/16 | x | |||
| 23 | 9-7/16 | x | |||
| 24 | 3-5/16 | x | |||
| 24 | 7-/14 | x | x | ||
| 24 | 11-3/16 | x | |||
| 25 | 5-1/8 | x | |||
| 25 | 7-1/16 | x | |||
| 26 | 2-15/16 | x | x | x | x |
| 26 | 10-13/16 | x | |||
| 27 | 13/16 | x | |||
| 27 | 6-11/16 | x | |||
| 27 | 10-5/8 | x | x | ||
| 28 | 2-9/16 | x | |||
| 28 | 8-1/2 | x | |||
| 28 | 10-7/16 | x | |||
| 29 | 6-5/16 | x | x | x | x |
| 30 | 2-3/16 | x | |||
| 30 | 4-3/16 | x | |||
| 30 | 10-1/16 | x | |||
| 31 | 2 | x | x | ||
| 31 | 5-15/16 | x | |||
| 31 | 11-7/8 | x | |||
| 32 | 1-13/16 | x | |||
| FEET | INCHES | 7.88″ | 9.84″ | 19.69″ | 39.38″ |
| Piece Length | Piece Length | Repeats and Matches | Repeats and Matches | Repeats and Matches | Repeats and Matches |
Calculating Area of 12′ Wide Sheet Flooring
| Length in inches | Square-Yard Equivalents | Length in Feet | Square-Yards Equivalents | Length in feet | Square-Yard Equivalents | Length in Feet | Square-Yard Equivalents |
| 1 | .11 | 1 | 1.33 | 34 | 45.33 | 67 | 89.33 |
| 2 | .22 | 2 | 2.67 | 35 | 46.67 | 68 | 90.67 |
| 3 | .33 | 3 | 4.00 | 36 | 48.00 | 69 | 92.00 |
| 4 | .44 | 4 | 5.33 | 37 | 49.33 | 70 | 93.33 |
| 5 | .55 | 5 | 6.67 | 38 | 50.67 | 71 | 94.67 |
| 6 | .67 | 6 | 8.00 | 39 | 52.00 | 72 | 96.00 |
| 7 | .78 | 7 | 9.33 | 40 | 53.33 | 73 | 97.33 |
| 8 | .89 | 8 | 10.67 | 41 | 54.67 | 74 | 98.67 |
| 9 | 1.00 | 9 | 12.00 | 42 | 56.00 | 75 | 100.00 |
| 10 | 1.11 | 10 | 13.33 | 43 | 57.33 | 76 | 101.33 |
| 11 | 1.22 | 11 | 14.67 | 44 | 58.67 | 77 | 102.67 |
| 12 | 16.00 | 45 | 60.00 | 78 | 104.00 | ||
| 13 | 17.33 | 46 | 61.33 | 79 | 105.33 | ||
| 14 | 18.67 | 47 | 62.67 | 80 | 106.67 | ||
| 15 | 20.00 | 48 | 64.00 | 81 | 108.00 | ||
| 16 | 21.33 | 49 | 65.33 | 82 | 109.33 |
| Length in inches | Square-Yard Equivalents | Length in Feet | Square-Yards Equivalents | Length in feet | Square-Yard Equivalents | Length in Feet | Square-Yard Equivalents |
| 17 | 22.67 | 50 | 66.67 | 83 | 110.67 | ||
| 18 | 24.00 | 51 | 68.00 | 84 | 112.00 | ||
| 19 | 25.33 | 52 | 69.33 | 85 | 113.33 | ||
| 20 | 26.67 | 53 | 70.67 | 86 | 114.67 | ||
| 21 | 28.00 | 54 | 72.00 | 87 | 116.00 | ||
| 22 | 29.33 | 55 | 73.33 | 88 | 117.33 | ||
| 23 | 30.67 | 56 | 74.67 | 89 | 118.67 | ||
| 24 | 32.00 | 57 | 76.00 | 90 | 120.00 | ||
| 25 | 33.33 | 58 | 77.33 | 91 | 121.33 | ||
| 26 | 34.67 | 59 | 78.67 | 92 | 122.67 | ||
| 27 | 36.00 | 60 | 80.00 | 93 | 124.00 | ||
| 28 | 37.33 | 61 | 81.33 | 94 | 125.33 | ||
| 29 | 38.67 | 62 | 82.67 | 95 | 126.67 | ||
| 30 | 40.00 | 63 | 84.00 | 96 | 128.00 | ||
| 31 | 41.33 | 64 | 85.33 | 97 | 129.33 | ||
| 32 | 42.67 | 65 | 86.67 | 98 | 130.67 | ||
| 33 | 44.00 | 66 | 88.00 | 99 | 132.00 |
E. ESTIMATING TILE FLOORS
The main differences between estimating tile floors and sheet floors are the use of small blocks as opposed to sheets of flooring and estimating in square feet rather than square yards.
To make tile estimates, find the area of the room by multiplying the length in feet and inches by the width in feet and inches. To this number add a factor for waste incurred in fitting the tile to walls and objects in the room. This number will give you an accurate estimate of the tile needed to cover the room.
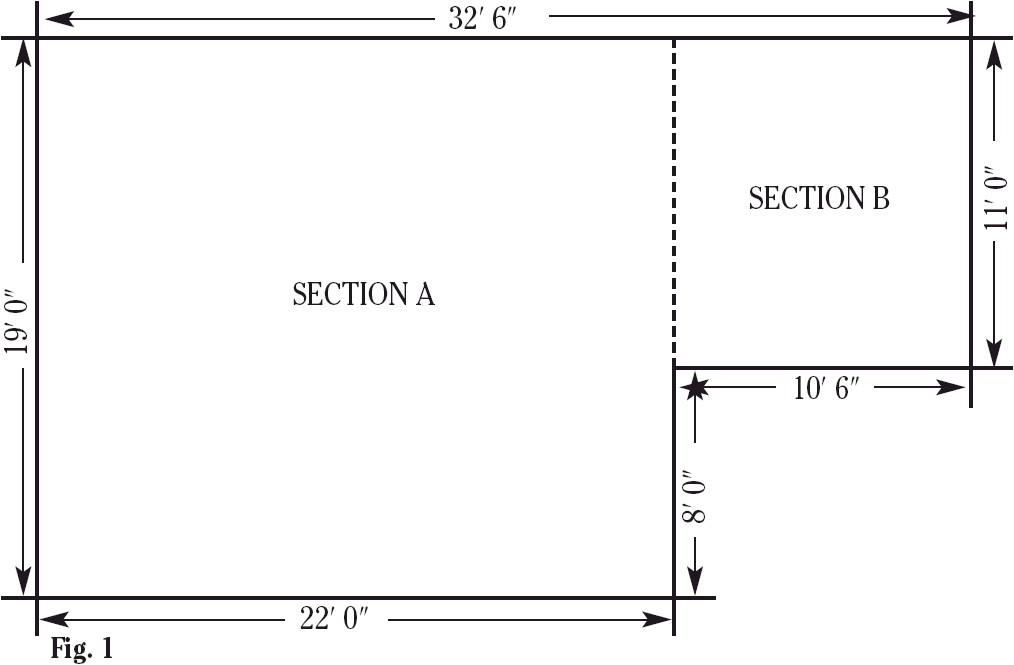
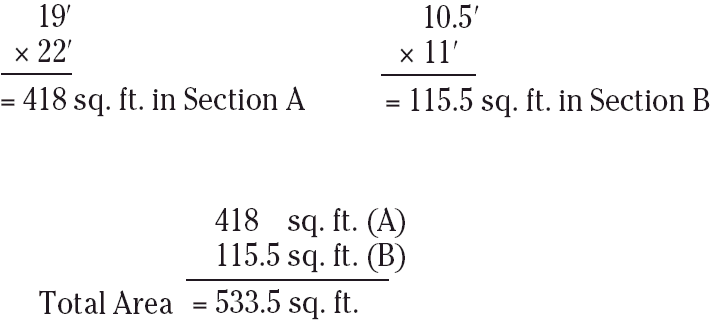
Rooms with irregular shapes, such as the room in Fig. 1, should be squared off into rectangles or squares to simplify estimating the area. In this room, you can establish two nearly square sections. Section A is 19′ x 22′. Section B is 10’6″ x 11′.
Approximate Percentage of Allowable Tile Waste for Various Area Sizes
The number of square feet of tile required is not equal to the number of square feet in the area of the room because the tile must be fit to walls and objects. A waste allowance must be added to the estimate. The percentage of waste is the same for diagonal and square layouts. It will vary, greater for small areas than for large areas. Irregularity of the area will also increase waste. The table below will serve as a guide in estimating the amount of waste to be figured for rooms of various sizes.
| Up to 50 sq ft | 14% |
| 50-100 sq ft | 10% |
| 100-200 sq ft | 8% |
| 200-300 sq ft | 7% |
| 300-1,000 sq ft | 5% |
| 1,000-5,000 sq ft | 3% |
| 5,000-10,000 sq ft | 2-3% |
| 10,000 sq ft and up | 1-2% |
The waste to be figured for a room containing 533.5 sq ft is found in the table under the 300 to 1,000 sq ft classification. In this case, 5% would be the allowable waste. Multiply the actual square footage of the room by the allowable waste and add this number to the actual square footage. This is the total square feet of tile required for the job.
| 533.5 sq ft x .05 waste = 26.675 sq ft for waste | 533.5 sq ft + 26.68 sq ft = 560.18 sq ft |
F. ESTIMATING ADHESIVE AND WALL BASE
1. Adhesive
Base the adhesive estimate on the square yardage or square footage of the actual room size. If you estimate the amount of adhesive based on the total square yardage of sheet goods, you could have too much adhesive, since there is more waste with sheet goods. You can estimate the amount of tile adhesive based on the total square footage of tile since there is not as much waste. To estimate the quantity of adhesive required, divide the square yardage or square footage of the room by the spreading capacity of the adhesive (in square yards per gallon).
2. Wall Base
The room dimensions or lineal feet in the perimeter of the room, less door openings, is the amount of wall base required. If wall base is to be applied to posts and fixtures in the room, add the lineal footage around these objects.