
THANK YOU FOR CHOOSING AHF PRODUCTS FLOORING.
If properly installed and cared for, your new flooring will be easy to maintain and will look great for years to come. If you have questions or comments, please visit us at www.ahfproducts.com or 1-866-243-2726.
These directions are based on industry standards and best practices. Failure to follow these installation instructions may result in damage to the flooring and void the floor’s warranty.
- For complete warranty information call 1-866-243-2726 or go to www.ahfproducts.com.
- For technical or installation questions, or to request a Safety Data Sheet, please call 1-866-243-2726 or visit www.floorexpert.com our technical website.
- For general questions or comments, please visit us at www.ahfproducts.com or call 1-866-243-2726
| WARNING: EXISTING IN-PLACE RESILIENT FLOOR COVERING AND ASPHALTIC ADHESIVES. DO NOT SAND, DRY SWEEP, DRY SCRAPE, DRILL, SAW, BEADBLAST, OR MECHANICALLY CHIP OR PULVERIZE EXISTING RESILIENT FLOORING, BACKING, LINING FELT, ASPHALTIC “CUTBACK” ADHESIVE, OR OTHER ADHESIVE. These existing in-place products may contain asbestos fibers and/or crystalline silica. Avoid creating dust. Inhalation of such dust is a cancer and respiratory tract hazard. Smoking by individuals exposed to asbestos fibers greatly increases the risk of serious bodily harm. Unless positively certain that the existing in-place product is a non-asbestos-containing material, you must presume it contains asbestos. Regulations may require that the material be tested to determine asbestos content and may govern removal and disposal of material. See current edition of the Resilient Floor Covering Institute (RFCI) publication Recommended Work Practices for Removal of Resilient Floor Coverings for instructions on removing all resilient floor covering structures or contact your retailer or AHF Products at 866 243 2726. AHF floor coverings and adhesives do NOT contain asbestos. |
| IMPORTANT HEALTH NOTICE FOR MINNESOTA RESIDENTS ONLY: THESE BUILDING MATERIALS EMIT FORMALDEHYDE. EYE, NOSE, AND THROAT IRRITATION, HEADACHE, NAUSEA AND A VARIETY OF ASTHMA-LIKE SYMPTOMS, INCLUDING SHORTNESS OF BREATH, HAVE BEEN REPORTED AS A RESULT OF FORMALDEHYDE EXPOSURE. ELDERLY PERSONS AND YOUNG CHILDREN, AS WELL AS ANYONE WITH A HISTORY OF ASTHMA, ALLERGIES, OR LUNG PROBLEMS, MAY BE AT GREATER RISK. RESEARCH IS CONTINUING ON THE POSSIBLE LONG-TERM EFFECTS OF EXPOSURE TO FORMALDEHYDE. REDUCED VENTILATION MAY ALLOW FORMALDEHYDE AND OTHER CONTAMINANTS TO ACCUMULATE IN THE INDOOR AIR. HIGH INDOOR TEMPERATURES AND HUMIDITY RAISE FORMALDEHYDE LEVELS. WHEN A HOME IS LOCATED IN AREAS SUBJECT TO EXTREME SUMMER TEMPERATURES, AN AIR-CONDITIONING SYSTEM CAN BE USED TO CONTROL INDOOR TEMPERATURE LEVELS. OTHER MEANS OF CONTROLLED MECHANICAL VENTILATION CAN BE USED TO REDUCE LEVELS OF FORMALDEHYDE AND OTHER INDOOR AIR CONTAMINANTS. IF YOU HAVE ANY QUESTIONS REGARDING THE HEALTH EFFECTS OF FORMALDEHYDE, CONSULT YOUR DOCTOR OR LOCAL HEALTH DEPARTMENT |
Installation:
Location: All grade levels
Tools:
Tapping Block, Pull Bar, Rubber Mallet, Utility Knife, Saw, Multi floor cutter, Spacers, 100% Silicone Caulk (Bathroom installations), Recommended adhesive (Glue down installations), 6 mil plastic (concrete installations).
OPTIONAL – (Add for Glue-Down Installations):
• Recommended adhesive and adhesive remover
• Scotch® Delicate Surface Painter’s Tape 2080
• 75-100 lb. Floor Roller
General Information:
Owner/Installer Responsibility
- The owner/installer has final inspection responsibility as to grade, manufacture and factory finish. Inspection of all flooring should be done prior to installation. The flooring should also be carefully examined for color, finish and quality before installing it.
- The installer must use reasonable selectivity and not use or cut off pieces with deficiencies, whatever the cause. Should an individual piece be doubtful as to grade, manufacture or factory finish, the installer should not use that piece. If material is not acceptable, do not install it and contact the seller immediately.
- Prior to installation of any flooring product, the owner/installer must determine that the job-site environment and the sub-surfaces involved meet or exceed all applicable standards. Recommendations of the construction and materials industries, as well as local codes, should be followed. These instructions recommend that the construction and subfloor be clean, dry, stiff, structurally sound and flat. The manufacturer declines any responsibility for job failure resulting from, or associated with, subfloor and substrates or job-site environmental deficiencies.
- The locking installation system allows the planks to be installed without using adhesive. It is a floating floor installation. The planks should be installed 1/4˝ away from all vertical objects such as walls, cabinets, pipes, etc.
- When installed in bathrooms, the gap should be filled and sealed with a good quality siliconized. The gap can then be covered with molding or wall base. Base cabinets should not be installed on top of the planks.
(OPTIONAL) Adhesives:
If a full spread glue down installation is desired with this flooring, use the recommended adhesive with the recommended trowel found on the pail. Follow the manufacturer’s instructions for the adhesive application.
Keys to Successful Locking Installation:
- Most installations will need approximately a 10% cutting allowance added to the square footage of the room.
- Proper conditioning of the job site is necessary. Flooring planks should not be exposed to sudden changes in temperature.
- Store, transport and handle the flooring planks in a manner to prevent any damage. Store cartons flat, never on edge. Ensure that the flooring planks are lying flat during installation.
- Installations of carpet, metal strips and other transition moldings should not pinch the flooring against the subfloor, and should allow for some slight movement wherever practical.
- Protect the floor from heavy-rolling loads, other trades, and movement of appliances by using sheets of plywood or similar.
- Although it is not necessary to acclimate engineered hardwood flooring it is best to store it in the environment in which it is expected to perform prior to installation. Check adhesive label for adhesive storage limitations.
Suitable Substrates
All substrates listed below must be properly prepared and meet certain requirements. There may be other exceptions and special conditions (as noted below) for these substrates to be suitable for the locking installation system.
- Concrete – Dry and smooth on all grade levels
- All concrete subfloors should be tested, and results documented, for moisture content. Visual checks may not be reliable. Test several areas, especially near exterior walls and walls containing plumbing. Acceptable test methods for subfloor moisture content include:
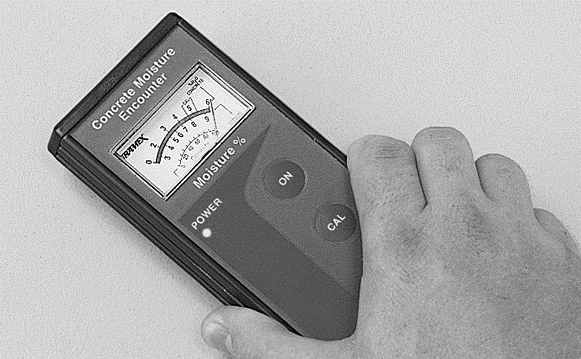
- Tramex Concrete Moisture Encounter Meter (Figure 1): Moisture readings should not exceed 4.5 on the upper scale. (Figure 1 shows an unacceptable reading of over 4.5) Concrete Moisture Meters give qualitative reading results-not quantitative ones. These results are a quick way to determine if further testing is required.
- Calcium Chloride Test (ASTM F 1869): The maximum moisture transfer must not exceed 3 lbs./1000 ft.2 in 24 hrs. With this test.
- Suspended wood subfloors with approved wood underlayments – must have minimum of 18˝ (0.46 m) well-ventilated crawl space underneath
- Suspended hardwood flooring that is fully adhered, smooth and square edge without texture
- Single-layer, fully-adhered, existing resilient floors – must not be foam-backed or cushion-backed
- Ceramic tile, Terrazzo, Marble
- Polymeric Poured (seamless) Floors
- Plywood
- OSB-3/4˝
- Particleboard 40lb. density or waferboard
DO NOT INSTALL OVER:
- Existing resilient tile floors that are below grade
- Existing cushion-backed vinyl flooring
- Carpet
- Hardwood flooring installed directly over concrete
- In rooms with sloping floors or floor drains
- Existing floating floors
Job Conditions/Preparations:
Subfloor Conditions
Floating floors may be installed over any subfloor that is structurally sound, flat, clean and dry on all grade levels. All substrates must meet or exceed all applicable building codes and be:
- CLEAN – Subfloor must be free of wax, paint, oil, sealers, adhesives and other debris.
- FLAT – Within 3/16˝ in 10´ (5 mm in 3 m) and/or 1/8˝ in 6´ (3 mm in 2 m). AHF Products is not responsible for flooring failures relating to subfloor flatness or subfloors that are not prepared properly following normal industry standards. Sand high areas or joints. Fill low areas with a latex additive cementitious leveling compound of 3,000-PSI minimum compressive strength. Follow the instructions of the leveling compound manufacturer. Leveling compounds must be tested for moisture to ensure they are within the specified requirements for proper installation.
- DRY – Check and document moisture content of the subfloor using the appropriate moisture test. Moisture content of wood subfloors must not exceed 12% on a wood moisture meter.
- STRUCTURALLY SOUND – Nail or screw any loose areas that squeak. Wood panels should exhibit an adequate nailing pattern. A typical pattern is 6˝ (15 cm) along bearing edges and 12˝ (30.48 cm) along intermediate supports. Flatten edge swell as necessary. Replace any water-damaged, swollen or delaminated subflooring or underlayments.
- Subfloors with excessive vertical movement should be avoided. Optimum performance occurs when there is little horizontal or vertical movement of the subfloor. If the subfloor has excessive vertical movement (deflection) before installation of the flooring, it is likely it will do so after installation of the flooring is complete.
- Engineered hardwood flooring should only be installed in temperature-controlled environments. It is necessary to maintain a constant temperature before, during and after the installation. Therefore, the permanent or temporary HVAC system must be in operation before the installation of the flooring. Portable heaters are not recommended as they may not heat the room and subfloor sufficiently. Kerosene heaters should never be used.
- All substrates must be structurally sound, dry, clean, flat, and smooth with minimal deflection. Substrates must be free from excessive moisture or alkali. Remove dirt, paint, varnish, wax, oils, solvents and other foreign matter, and contaminates.
- High spots on the substrate should be leveled and low areas filled with appropriate underlayments.
- Do not use products containing petroleum, solvents or citrus oils to prepare substrates as they can cause staining and expansion of the new flooring.
- For renovation or remodel work, remove any existing adhesive residue so that 100% of the overall area of the original substrate is exposed.
- Ceramic tile floors, ceramic and marble grout joints, and irregularities in concrete should be filled and leveled using a cementitious patch to fill and smooth any embossing in the old floor.
- The area to receive the flooring materials and adhesives should be maintained between 65°-85°F (18°-29°C) for 48 hours before installation, during installation, and 48 hours after completion. After installation the room temperature should not exceed 85°F (29°C) or fall below 55°F (12.8°C).
- Radiant heated substrates must not exceed a maximum surface temperature of 85°F (29°C).
- The subfloor panels must have a smooth, sanded face and show no swelling of edges or surface due to exposure to weather conditions or construction traffic.
- There are numerous products available for use as floor fills, patches, self-leveling underlayments, and trowelable underlayments. They include proprietary blends of compounds such as portland cement, calcium aluminates, and gypsum-based products. These are recommended by their manufacturers for smoothing rough or uneven subfloors,enhancing acoustical and fire characteristics of structures or as substrates to receive floor covering for otherwise unsuitable subfloor conditions. If the subfloor surface appears to be dusty then apply a primer to the surface.
Safety and Clean Up:
Wet adhesive should be cleaned up immediately with soap and water on a clean cloth. Dried adhesive may require the use of a solvent-based adhesive cleaner.
Installation Preparation:
Before You Start
- Before installing the planks, central heat or air conditioning should be operating for 14 days.
- Install only at room temperature above 60˚F (16˚C) and 30-50% humidity conditions.
- In rooms with under-floor (radiant) heating, the surface temperature of the subfloor may not, under any circumstances, exceed 85˚F (29˚C). Increasing heat should be done in 5-degree increments. Ascertain that the subfloor is properly engineered or controlled for the flooring being installed. Subfloors designed for materials with higher resistance to heat transfer, such as carpet, WILL damage the flooring. Installations that include multiple floor covering products on a single heating circuit must be adjusted for the flooring product with the highest heat transfer or lowest temperature requirement.
- When possible, preselect and set aside boards that blend best with all horizontally mounted moldings (reducer/stair nose etc.) This will assure a uniform final appearance. Install these boards adjoining the moldings.
- Floor should be installed from several cartons at the same time to ensure good color and shade mixture.
STEP 1: Doorway and Wall Preparation
(All Installations)
- Undercut door casings and jambs. Remove any existing base, shoe mold or doorway thresholds. These items can be replaced after installation. When undercutting door casings the installer should confirm there is the recommended expansion space. The floor must have 1/16˝ (1.6 mm) clearance under the door casing to be able to float freely without vertical restriction (Floating installations).
STEP 2: Plan Your Layout Using the Following Steps
(All Installations)
- Stiffen subfloors as necessary to prevent vertical movement.
- Note: Larger rooms may require additional expansion space. Add an additional 1/16˝ (1.6 mm) for every three feet beyond 25 feet up to a maximum of 40 feet. Rooms exceeding 40 feet in length or width should use a t-mold in addition to the additional expansion space. (Floating Installations only).
Layout the Herringbone Pattern:
Sorting
- Before building the starting triangles, separate the hardwood into two separate piles for “A” planks and “B” planks. Planks are stenciled on the back with the appropriate letter (Figure 2).

Build Starting Triangles
- Take the A-planks and B-planks and position them (engage locking system) as seen in the picture above. When engaging the locking mechanism make sure all edges and corners are flush (Figure 3).

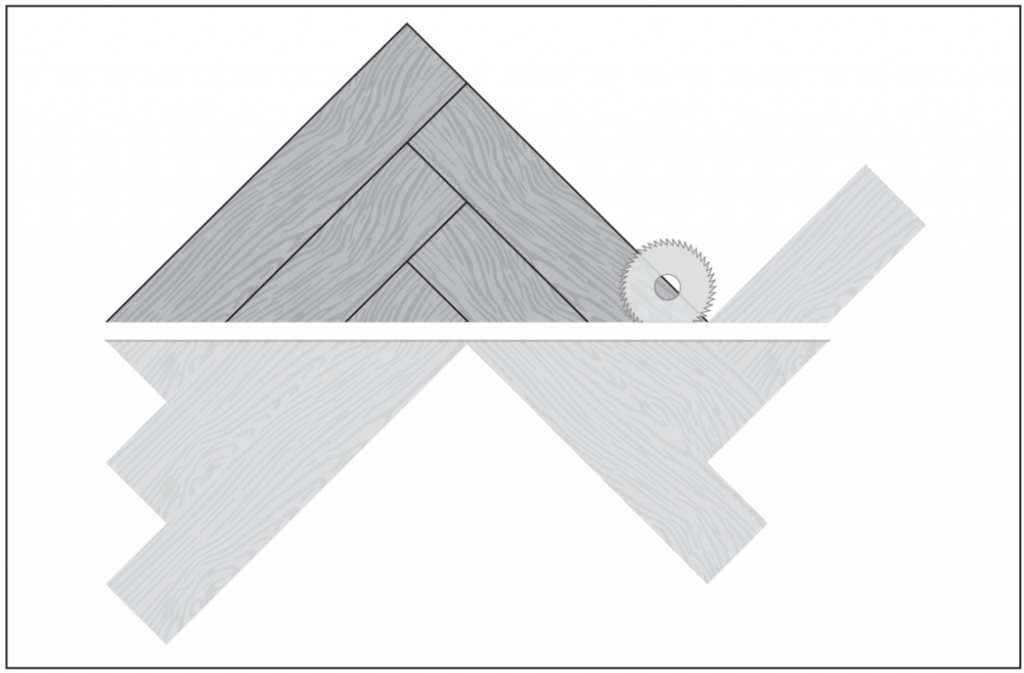
- Cut the first triangle as shown. If using a table saw,it is best to mark the plank A-1, B-2, A-3, B-4, A-5 and disengage the triangle (Figure 4).
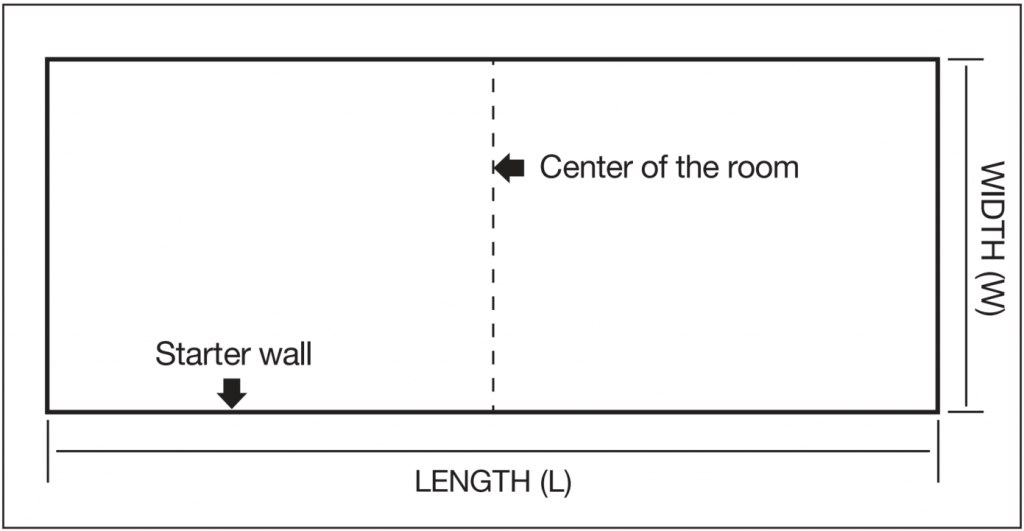
- Find the center of the starting wall and center of the opposite wall. Snap a chalk line down the center of the room connecting these two points (Control line) (Figure 5).
Find the X Measurement
- On an assembled triangle, measure the distance between between two straight lines, starting at the corner of the planks (Figure 6)

- Divide the measurement from the previous bullet point by two to get the X measurement (Figure 7).

Draw the Installation Line.
- Start from the center of the room. Offset the line using the X measurement as the distance and snap a chalk line (Figure 8).

- Calculate the number of starting triangles needed with this formula. Round up to the next full number (Figure 9).

Starting the Installation
- Lay the starting triangles with the long side against the starting wall. The point of the center triangle should line up with the installation line (Figure 10).

Finishing the Starting Row
- Cut the distances C-D and E-F from the remaining triangles to finish the starting row (Figure 11)

Continuing the Installation
- Install “A” planks to connect all triangles. The joints between the “A” planks and the triangle need to checked as they are laid. The edges must be flush or run-off can occur (Figure 12).
- Cut the far left piece to size against the wall while maintaining the expansion gap. Measure the installation line to maintain straightness. Continue checking the installation line as you build your herringbone pattern. Run-off needs to be corrected as it is encountered.

Continuing the Installation
- Install the “B” planks across the starting row, cutting the far right piece to size against the wall (Figure 13).
- Continue installing in this fashion until you reach the last row. Make sure to continue to check the installation line as the installation progresses.

Check for:
- Expansion room
- Tight joints and proper locking between joints
- Maintain installation line
- Points of the planks remain straight and perpendicular to the installation line
- Periodically measure to maintain straightness along the installation line
Last Row of the Installation
- Use starting triangles to complete the last row of the installation (Figure 14).

- Use the leftover planks 1, 2 etc. consecutively and cut to size against the ending wall (Figure 15).

Installing Under a Door Jamb (All Installations)
- Installations of locking floors under moldings, such as a doorjamb, may require that the top lip of the groove on the end be reduced in size.
- Using a small plane or knife plane, shave off the ledge of the groove.
- After the groove edge has been trimmed, place the board into place and tighten with a pull bar to test for fit. The installer must be certain that the proper expansion space is maintained and the flooring is not pinched.
- If fit is incorrect, trim as necessary. Remove any wax from the end joint so you will get good adhesion.
- Place a bead of recommended wood glue on the bottom lip of the groove.
- Reinsert the tongue into the groove and tighten the board with a pull bar. Hold the board in place with painter’s tape (Scotch® Delicate Surface Painter’s Tape 2080) until the glue is dry. Do not use masking tape or duct tape, as the surface may be damaged.
Installing in Kitchens or Bathrooms
- Prolonged exposure to water could damage the flooring. Installation and maintenance recommendations should be closely followed to prevent water from contacting the core material of the flooring.
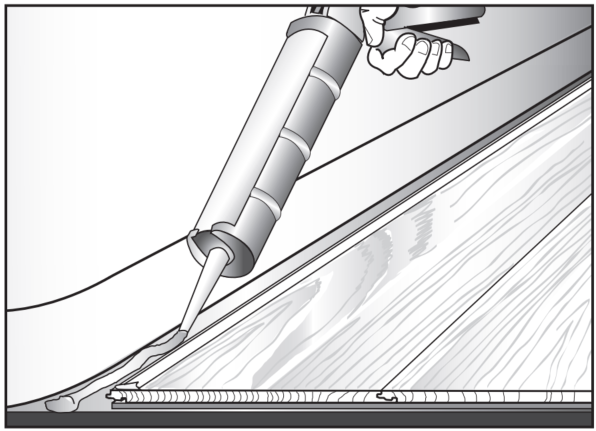
- All perimeter expansion zones must be completely filled with 100% silicone caulk following the manufacturer’s recommendations. When applying caulk, it is helpful to first apply a strip of painter’s tape (Scotch® Delicate Surface Painter’s Tape 2080) parallel to and approximately 1/32˝ (0.79 mm) from the edge (Figure 16). Then fill the expansion zone with caulk, remove the excess with a plastic scraper or putty knife and remove the tape.
- The toilet should be removed before installing the flooring. Allow a 1/2˝ (12.7 mm) expansion zone between the flooring edge and the toilet flange. Completely seal the zone with 100% silicone caulk.
OPTIONAL – Glue Down Installation:
General Information for Glue-Down Applications
NOTE: DO NOT INSTALL FLOORING USING RUBBER MALLETS. STRIKING THE SURFACE WITH A RUBBER MALLET MAY “BURN” THE FINISH CAUSING IRREPAIRABLE DAMAGE
- When not in use, keep the adhesive container tightly closed to prevent thickening. Thickening will cause difficulty in spreading the adhesive.
- Open times and curing times of ALL adhesives vary dependent upon subfloor porosity, air movement, humidity and room temperature. Urethane adhesive has a shortened working time in high humidity environments. In areas of low humidity, open time will be longer with urethane adhesives and shorter with some adhesives. Adjust the amount of adhesive spread on the subfloor accordingly. The adhesive should not be applied if subfloor or room temperature is below 60°F (16°C). WORKING TIME WILL VARY DEPENDING ON JOB SITE CONDITIONS.
- Hold trowel at a minimum 45° angle (Figure 18) firmly against the subfloor to obtain proper spread rate per gallon.
- Hold trowel at a minimum 45° angle (Figure 18) firmly against the subfloor to obtain proper spread rate per gallon.
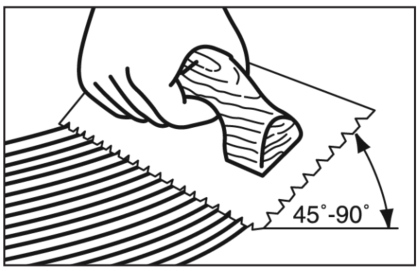
- For additional application instructions, follow the recommendations on the adhesive container.
- Proper ventilation within the room to mitigate fumes. An electric fan is helpful. Position the fan so it does not blow directly on the adhesive.
STEP 3: Spread the Adhesive (Glue-Down Installations)
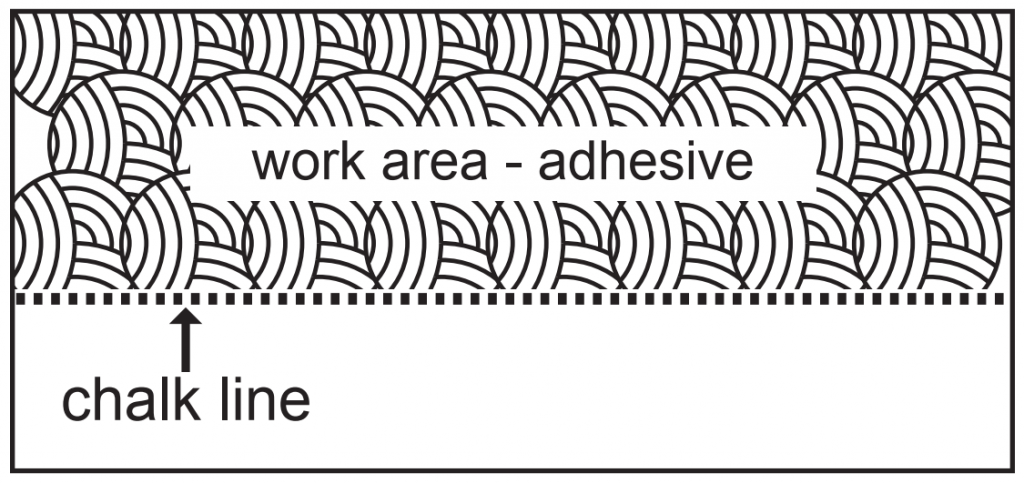
- Spread sufficient amounts of the recommended adhesive with there commended trowel in an area that can be covered within the working time of the adhesive. Be sure not to spread adhesive too far ahead of your work area (Figure 19).
NOTE: Avoid installing on the surface of the flooring. If necessary, distribute weight using a kneeler board.
STEP 4: Installing the Floor (Glue-Down Installations)
- Follow the steps outlined above after spreading the recommended adhesive.
NOTE: Clean adhesive from the surface of the floor frequently, using the recommended adhesive cleaner. Urethane adhesives become extremely difficult to remove when cured. Do not use Scotch® Delicate Surface Painter’s Tape 2080 before adhesive is removed from the surface. Use clean towels, changed frequently, to prevent haze and adhesive residue.
- Check for a tight fit between all edges and ends of each plank. End-joints of adjacent rows should be staggered a minimum of 16˝ (40.64 cm) when possible, to ensure a more favorable overall appearance.
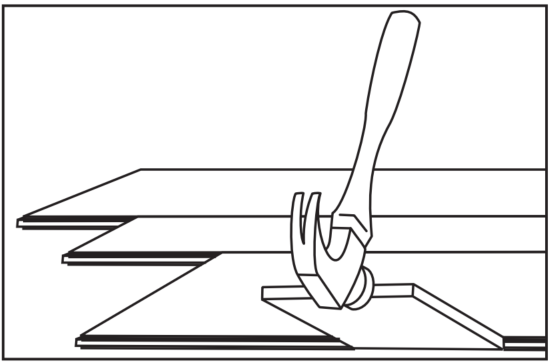
- It may be necessary to align the product with a cut-off piece of scrap as shown (Figure 20 – Keep scrap angle low to avoid edge damage).
- To eliminate minor shifting or gapping of product during installation, use Scotch® Delicate Surface Painter’s Tape 2080 to hold the planks together. After installation is complete, remove all of the Scotch® Delicate Surface Painter’s Tape 2080 from the surface of the newly installed flooring. Do not let the tape remain on the flooring longer than 24 hours. Avoid the use of masking or duct tape, which leaves an adhesive residue and may damage the finish.
- If necessary, use weights to flatten boards with bows until adhesive cures, in order to prevent hollow spots. Boards that cannot be flattened should be cut in length to reduce the bow, or not used.
- Roll and cross roll the floor with a 75-100 lb. roller within one hour of the installation and again two hours to ensure proper transfer of the adhesive.
- Avoid heavy foot traffic on the floor for a period of 6-12 hours. Lift the furniture or fixtures back into place after 24 hours.
Proactive Protection for Your Floor:
- When moving appliances or heavy furniture it is always wise to lay a plywood panel, or similar, on your floor and “walk”the item across it. This protects your floor from scuffing, gouging and tears.
- Use floor protectors under furniture to reduce indentation. As a general rule of thumb, the heavier the item, the wider the floor protector needed.
- Place a walk-off mat at outside entrances to reduce the amount of dirt brought into your home. We strongly recommend mats without a latex or rubber backing since these backings can cause permanent discoloration.
Caring for Your Floor:
- Sweep or vacuum regularly, to remove loose dirt which can scratch your floor. Note: We do not recommend vacuums that have a beater bar since it can visibly damage your flooring surface. Additionally, we do not recommend electric brooms with hard plastic bottoms with no padding as use may result in discoloration and deglossing.
- Wipe up spills as soon as possible. Never use highly abrasive scrubbing tools.
- Clean your floor routinely using Bruce® Hardwood and Laminate Floor Cleaner.
- Do NOT use detergents, abrasive cleaners, or “mop and shine” products. These products may leave a dull film on your floor.
- Like other types of smooth floors, can become slippery when wet. Allow time for floor to dry after washing. Immediately wipe up wet areas from spills, foreign substance, or wet feet.
Repair Procedure:
For detailed repairs and maintenance guidelines, please visit AHF Products technical website www.floorexpert.com