Product Information
Traffic Type: Residential, Light Commercial, Commercial
Overall/Wear Layer Thickness: 1/8″ (3.2 mm)
Length x Width: College, High School, or Junior High Basketball Court (Includes lines only. Requires separate field tile to complete court)
Finish: Fast Start® (polish required before traffic)
Face Treatment: Traditional Smooth
Edge Treatment: Square Edges
Manufacturing Location: USA
Warranty
20 Year Commercial Limited Warranty*
*Add 10 years of overall Warranty coverage by using Strong System™ subfloor preparation products. Visit ArmstrongFlooring.com or FloorExpert.com for more information.
Product Structure

Product Features
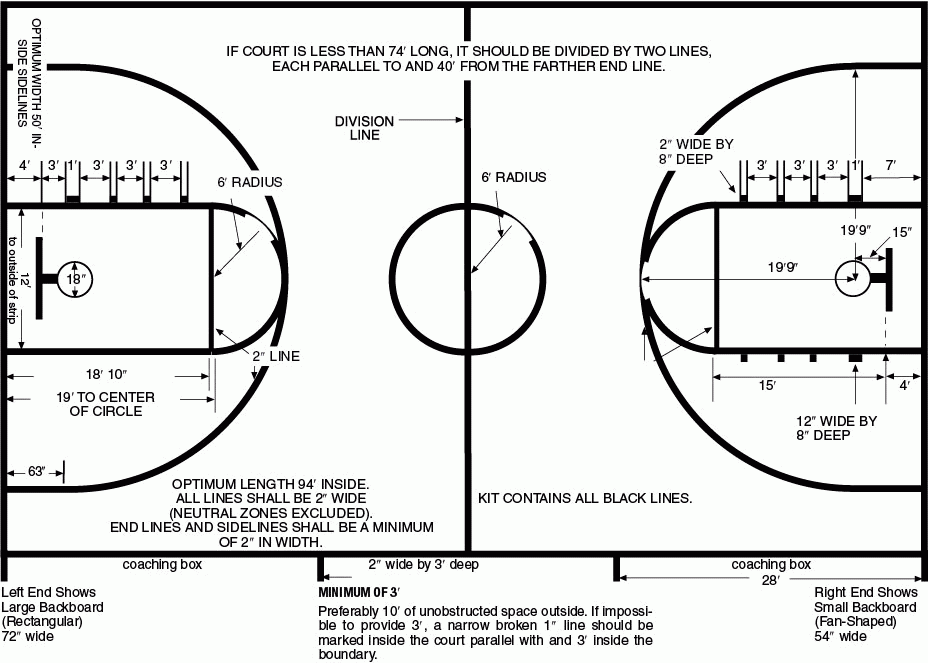
![]() Kit includes court lines only. Field tile must be chosen and ordered separately.
Kit includes court lines only. Field tile must be chosen and ordered separately.
Kit consists of pre-cut Premium Excelon Feature Tile and Strips
Use To Create These Standard Court Dimensions
College 50′ x 94′
High School 50′ x 84′
Junior High 42′ x 74′
Each kit contains all the necessary Feature Strips and curved segments for straight boundary lines, circular markings and three-point goal markings. Sufficient material is provided for a standard college court. To create high school or junior high courts, reduce the number of segments to form the standard perimeter dimensions listed above. Note: Field tile is not included in the court unit and will need to be ordered separately.
Kit Contents
1 Pallet of 3 Cartons
Color: Black
Model Number: 50517 (831)
Total weight of Basketball Kit: (3ctns) 174 lbs
1. Carton 1 – Labeled “Circles 1 of 3”
- Large box
- Instructions and Court Diagram
- 40 pcs – Arc for 6′ radius circles
- 4 pcs – 8″ x 12″ Blocks for free throw lanes
- 163 pcs – 2″ x 24″ Feature strips
2. Carton 2 – Labeled “Strips 2 of 3” (note this is actually a bundle of 3 cartons)
- Bundle
- 3 ctns of 2″ x 24″ Feature strips with 24 pcs each ctn (72 pcs total)
3. Carton 3 – Labeled “3 Pnt Arc 3 of 3”
- Medium box
- 67 pcs – Arc for 19′-9″ radius circle (66 pcs plus 1 pc extra)
- 13 pcs – 2″ x 24″ Feature strips (12 pcs plus 1 pc extra)
Specifications
MATERIAL: A composition of polyvinyl chloride resin, plasticizers, stabilizers, fillers, and pigments.
CONSTRUCTION AND COLORS: Color and pattern detail are dispersed uniformly throughout the thickness of the material. Color pigments are insoluble in water and resistant to cleaning agents and light.
NOTE: Solid color Feature Tile tends to show scratching and soiling more readily than patterned flooring. We recommend not installing Feature Tile as full field installations or in high traffic areas.
GLOSS: (typical value) 60° specular, 20-40 Light Reflectivity Chart: CLICK HERE.
REFERENCE SPECIFICATIONS:
ASTM F 1066 Vinyl Composition Floor Tile, Class 1 – solid color
Testing
| Per ASTM F 1066 | |||
|---|---|---|---|
| Performance | Test Method | Requirement | Performance vs. Requirement |
| Thickness | ASTM F386 | Nominal ± 0.005 in. | Meets |
| Size | ASTM F2055 | ± 0.016 in. per linear foot | Meets |
| Squareness | ASTM F2055 | 0.010 in. max | Meets |
| Indentation – One Minute | ASTM F1914 | ≥ 0.006 in. to ≤ 0.015 in. | Meets |
| Indentation @ 115°F | ASTM F1914 | < 0.032 in. | Meets |
| Impact | ASTM F1265 | No cracks beyond limit | Meets |
| Deflection | ASTM F1304 | 1.0 in. minimum | Meets |
| Dimensional Stability | ASTM F2199 | ≤ 0.024 in. per linear foot | Meets |
| Chemical Resistance | ASTM F925 | No more than slight change in surface dulling, attack or staining | Meets |
| Resistance to Heat | ASTM F1514 | ΔE < 8.0 | Pass, Class 4 Heavy Commercial |
| Additional Testing | |||
|---|---|---|---|
| Performance | Test Method | Requirement | Performance vs Requirement |
| Static Load Resistance | ASTM F970* | < 0.005 in. | 2000 psi |
| Fire Test Data – Flame Spread | ASTM E648 | 0.45 W/cm2 or more Class 1 | Meets |
| Fire Test Data – Smoke Evolution | ASTM E662 | 450 or less | Meets |
| Fire Test Data – Canada | CAN\ULC S102.2 | Use dependent | Flame Spread – 0 Smoke Developed – 30 |
| ADA Standards for Accessible Design | Chapter 3 Section 302.1 | Floor surfaces shall be stable, firm and slip-resistant | Meets |
| Static Coefficient of Friction** | ASTM D 2047/ UL 410 | ≥ 0.5 | Meets |
**Using the James Machine as described in D2047 and as directed in UL 410 for floor covering materials (FCM) using a leather foot under dry conditions. The application of site-applied floor sealers, polishes and other types of finishes routinely used to maintain resilient flooring materials will change the walking surface and consequently the SCOF value.
Sustainability
LEED Credit Information – Commercial
Sustainable Design Information
FloorScore Certificates – Vinyl Composition Tile
Environmental Product Declaration (EPD) – Vinyl Composition Tile
SDS
Resilient Sheet Flooring Products and Resilient Tile Flooring Products MIS
Installation
| Location: | All grade levels |
| System: | Commercial Tile Installation System |
| Fitting: | Tile cutter, straight scribe, hot knife |
| Adhesives: | S-515 S-319 S-1000 Flip Spray Adhesive |
- Precaution: Do not install over existing below-grade tile.
All procedures for installing Excelon tile apply to the installation of the basketball court inset. The layout of the basketball court is based on the location of the basketball goals. IMPORTANT: The backboards must be properly installed and the correct distance apart before starting the installation. Check this by measuring.
- Mark the floor at each end of the court directly under the center of the front edge of each goal by using a plumb bob and snap a chalk line through these points. measure back 9″ from each original mark to locate the center of the goals.
- Strike a perpendicular line at the midpoint of the original line. This will be the division line.
- Use the center lines to determine the boundaries and strike chalk lines on four sides.
- Construct a circle with a radius of 6 feet.
- Lay out key and three-point lines. Use the center of the goal as the starting point.
- Install the center court line, boundary lines and sidelines of the key following the chalk lines outlined in steps 1, 3 and 5. DO NOT install center court circle, three-point line or key circle.
- Begin laying tile at the division line and work toward the goals. Cut 1″ from each tile on other sides of the division line so that tile outside the boundary will align properly.
- Transfer the center court and goal reference marks, and rescribe the circles onto the tile.
- Position the preformed feature strips along the scribe lines and adjust as needed by warming them with a hot air gun. Hold the feature strips securely and score along the opposite side with a knife.
- Lay the Feature Strips to the side and warm the area to be removed with a hot air gun. Cut the scored lines all the way through and remove the parts where the feature strips will be placed. Scrape the excess adhesive residue smooth, spread new adhesive and install feature strips
Care and Maintenance
Maintenance Recommendations:
Commercial Care & Maintenance Instructions for VCT
Maintenance Products:
Cleaner: Armstrong Flooring S-485
Polish: Armstrong Flooring S-480
Court Layout