
Precautions
![]() Caution Eye and Skin Irritant
Caution Eye and Skin Irritant
SDS
For Use With
Product Information
| Type | Water-based/resin |
| Color | White |
| Taggants | Saturn Yellow |
| Coverage | 1/8” bead: Approximately 144 lin. ft./bottle (43 lin. m.) |
| Units | 8 oz (236 mL) bottle; 6 or 12 per carton |
| Open Time | None recommended |
| Working Time | 15 minutes |
| Dry Time | User can walk on seam after 2 hours, 4-6 hours is full dry time. |
| Shelf Life | 1 year, unopened |
| Freeze/Thaw Stable | No, keep from freezing |
| VOC Content | 45 g/L; calculated and reported, SCAQMD 1168 |
| Clean Up | Wet– clean, white cloth with neutral detergent and water Dry– clean, white cloth and mineral spirits |
| Advantages | Strong bond for flooring seams. Conceals the seam. Easy installation, easy clean up. |
| Manufacturing Location | USA |
| SKU | Quantity and Market |
| 00763123 | 12 pack carton – US |
| 00763603 | 6 pack carton – US |
| S-7631123 | 12 pack carton – Canada |
Sustainability
LEED Credits: EQ 4.1
FloorScore Certificates – Adhesives and Installation Products
Sustainable Design Information
LEED Credit Information – Installation Products
Application Instructions
COMMERCIAL SHEET INSTALLATIONS – S-763 Seam Adhesive Procedure
S-763 Seam Adhesive helps significantly reduce installation time compared to traditional seaming methods and allows for a broader range of installer skillsets. It is an alternative to heat welding in commercial installations of vinyl sheet flooring where an impervious floor covering is not required.
![]() Note: Armstrong S-763 Seam Adhesive is not recommended in health care operating rooms, procedural rooms or any space where an aseptic environment is necessary. Heat-welded seams are recommended for those types of applications.
Note: Armstrong S-763 Seam Adhesive is not recommended in health care operating rooms, procedural rooms or any space where an aseptic environment is necessary. Heat-welded seams are recommended for those types of applications.
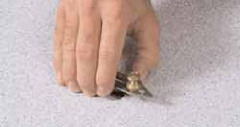
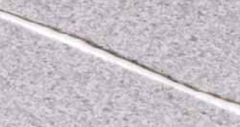
- Use a recess scribing tool to recess scribe all seams net (Fig.1).
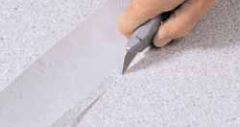
- Insert a piece of scrap material beneath the scribe mark. With the scrap on the same side as the cutting hand, cut the seam at a 90-degree angle. Be sure to hold the knife blade straight up and down (Fig. 2).
- Remove the scrap piece of material.
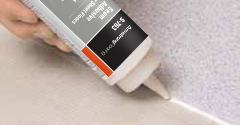
- Using the applicator bottle, apply a 1/8″ bead of S-763 Seam Adhesive along the seam edge (Fig. 3).
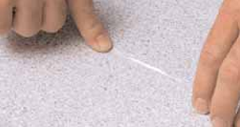
- Tuck the seam edge into place, forcing the S-763 Seam Adhesive up through the seam (Fig. 4).
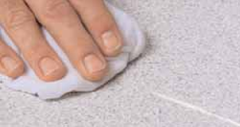
- Clean adhesive residue from the surface of the flooring using a clean, white cloth dampened with neutral detergent and water (Fig. 6).
- Roll the seam using a hand roller (Fig. 7).
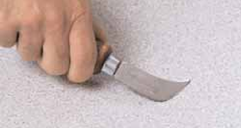
- Remove burr at the seam by carefully skiving with the back of the linoleum knife (Fig. 8).
- Roll immediately in both directions with a 100-lb. roller.
 |  |
| Figure 1 | Figure 2 |
 |  |
| Figure 3 | Figure 4 |
 |  |
| Figure 5 | Figure 6 |
 |  |
| Figure 7 | Figure 8 |
RESIDENTIAL SHEET INSTALLATIONS – S-763 Seam Adhesive Procedure
See attached file below for illustrated instructions.
S-763 Seam Adhesive helps reduce installation time significantly compared to traditional seaming methods.
Modified Loose Lay Installations
- Double-cut the seam before applying the vinyl tape or adhesive.
- After seam is cut, fold back both edges and apply the tape or adhesive.
- After applying the tape or after proper open time with the adhesive place one side back down.
- Using the applicator bottle, apply a 1/8″ bead of S-763 Seam Adhesive along the seam edge.
- Tuck the seam edge into place, forcing the S-763 Seam Adhesive up through the seam.
- Clean adhesive residue from the surface of the flooring using a clean, white cloth dampened with neutral detergent and water.
- Roll the seam using a hand roller.
- Allow 2 hours before foot traffic and 4 to 6 hours to fully dry for rolling loads.
S-295 or S-299 Full Spread Adhesive Installations
- Double-cut the seam dry before applying the adhesive.
- After seam is cut, fold back both edges and apply the adhesive.
- After proper open time (dry-to-touch over non-porous substrate) place one side back down.
- Using the applicator bottle, apply a 1/8″ bead of S-763 Seam Adhesive along the seam edge.
- Tuck the seam edge into place, forcing the S-763 Seam Adhesive up through the seam.
- Clean adhesive residue from the surface of the flooring using a clean, white cloth dampened with neutral detergent and water.
- Roll the seam using a hand roller.
- Roll immediately in both directions with a 100-lb. roller.
- Allow 2 hours drying before foot traffic and 4 to 6 hours to fully dry for rolling loads.
Product Image
