
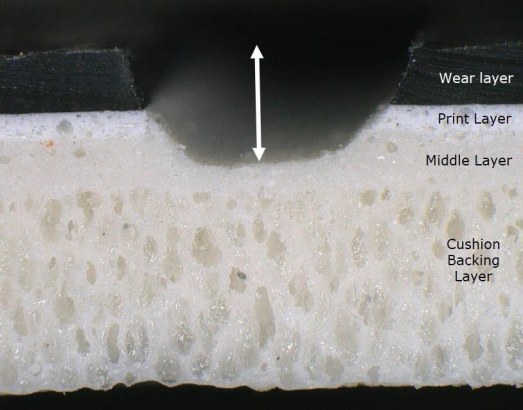
For Use With
- Natralis Homogeneous Vinyl Sheet
- Medintone Homogeneous Vinyl Sheet
- MedinPure PVC-Free Homogeneous Sheet
- Nidra Heterogeneous Sheet
- Zenscape Heterogeneous Sheet
THANK YOU FOR CHOOSING AHF PRODUCTS FLOORING
If properly installed and cared for your new flooring will be easy to maintain and will look great for years to come.
These directions are based on industry standards and best practices. Failure to follow these installation instructions may result in damage to the flooring and void the floor’s warranty.
- For complete warranty information call 1-866-243-2726 or go to www.ahfproducts.com.
- For technical or installation questions, or to request a Safety Data Sheet, please call 1-866-243-2726 or visit www.floorexpert.com, our technical website.
- For general questions or comments, please visit us at www.ahfproducts.com or call 1-866-243-2726
Summary
Installation – S-995 Adhesive, S-999 Bondstrong Tape, Flip Spray Adhesive, S-1000 Flooring Adhesive*
Seams – Heat Weld or S-763 Seam Adhesive; protect heat welded seams with S-762 Weld Rod Coating Pen
Seam Method – Recess Scribe
Location – All grade levels
Substrates – Concrete; Approved Suspended Wood; Steel, Stainless Steel, Aluminum; Ceramic Tile, Terrazzo, Marble; Existing Resilient Floors; Polymeric Poured (Seamless Floors)
*Only for use with homogeneous sheet in environmental conditioning units.
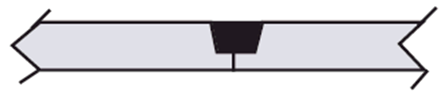
PATTERN MATCH
Based on the collection, follow the pattern match requirements below. Also, keep in mind that shade variation can occur because of the sheet manufacturing process. When installing more than one roll of material, any potential jobsite shade variation can be reduced by:
- Making sure all rolls share the same pattern number and the same shade lot/batch number.
- Installing material sequentially by roll number.
- Installing all cuts in the order of their removal from the roll.
- If material from more than one batch is unavoidable, the job should be planned so that different batch numbers are not installed side by side or in the same location.
| Category | Collection | Pattern Match Requirement |
| HOM | Natralis Medintone MedinPure PVC-Free | Reverse Pieces Trademark (™) Edge to Trademark (™) Edge |
| HET | Nidra Zenscape | Do Not Reverse Pieces Trademark Edge to Non-Trademark Edge |
RECOMMENDED ADHESIVES & SEAM METHODS
| Products | Adhesives | Seam Treatments | |||||
|---|---|---|---|---|---|---|---|
| Category | Collection | S-995 | S-999 | Flip | Heat Weld | Heat Weld Temperature | S-763 |
| HOM | Natralis Medintone MedinPure PVC-Free | √ | √ | √ | √ | 340° – 450°C 650° – 850°F | √ |
| HET | Nidra Zenscape | √ | √ | √ | √ | 340° – 450°C 650° – 850°F | √ |
| Concentrated Static and Dynamic Loads | Environmental Conditioning Units | |
|---|---|---|
| HOM | S-995 S-999 | Medintone only: S-1000 |
| HET | S-995 S-999 | — |
Flash Coving:
NOTE: Apply a coat of flash coving adhesive, vinyl tape (3.75”), or S-995 Adhesive with the recommended trowel on the entire cove area. Allow adhesive to dry to a pressure sensitive state between applications. Roll the flooring into the adhesive or tape with a hand roller.
ACCEPTABLE SUBFLOORS & UNDERLAYMENTS
Wood
Flooring can be installed on suspended wood, OSB, or a treated plywood subfloor with a 1/4” underlayment and a minimum of 18” of well-ventilated air space below. AHF Products does not recommend installing Armstrong Flooring resilient flooring on wood subfloors applied directly over concrete or on sleeper-construction subfloors over, on, or below grade concrete. Subfloors must meet local and national building codes. Trade associations, such as the APA – The Engineered Wood Association, offer structural guidelines for meeting various code requirements. Refer to ASTM F 1482 Standard Practice for Installation and Preparation of Panel Type Underlayments to receive Resilient Flooring for additional information
Wood strip, board, or plank subfloors must meet structural requirements. If the top layer is tongue-and-groove and the strip wood is 3” or less in face width, cover with 1/4” or thicker underlayment panels. All other layers should be covered with 1/2” or thicker underlayment panels.
Subject to the board manufacturer’s recommendations and warranties, the following underlayments may be used with Armstrong Flooring products:
- Plywood rated as suitable underlayment for resilient floor coverings
- Poplar or Birch Plywood with a fully sanded face and exterior glue
- Lauan Plywood, Type 1 (Exterior)
- Fiber Reinforced Gypsum Underlayment, Fiber Cement Board & Cementitious Backerboard rated as suitable underlayment for resilient floor coverings
AHF Products does not recommend OSB or Treated Plywood (unless covered with a 1/4″ of APA plywood underlayment), Particleboard or Hardboard.
Underlayments for resilient floors must:
- be structurally sound
- be designed for resilient flooring underlayment purposes
- be a minimum of 1/4″ thick
- have panels smooth enough so that texture or graining will not show through
- resist dents and punctures from concentrated loads
- be free of any substance that may stain vinyl such as edge patching compounds, marking inks, paints,solvents, adhesives, asphalt, dye, etc
- be installed in strict accordance with the board manufacturer’s recommendations
For approved underlayments, AHF Products suggests the panels be lightly butted and not filled or flashed, unless the manufacturer specifically recommends filling the joints. Differences in the thickness of wood panels should be corrected by sanding. Allow the panels to condition to the job site per manufacturer’s recommendations.
Concrete
New and existing concrete subfloors must meet the requirements of the current edition of ASTM F710, “Standard Practice for Preparing Concrete Floors to Receive Resilient Flooring”. Regardless of the type of concrete or other cement-like material used as a base for resilient flooring, in the event of underlayment failure, the responsibility for warranties and/ or performance guarantees rests with the concrete or cement- like material manufacturer and not with the manufacturer of resilient flooring.
Below-Grade & On-Grade Concrete Floors
- The slab must be of good quality, standard density concrete with low water/cement ratios consistent with placing and finishing requirements, having a maximum slump of 4”, a minimum compressive strength of 3000 psi, and following the recommendations of ACI Standard 302.1R for Class 2 or Class 4 floors and the Portland Cement Association’s recommendations for slabs on ground.
- The concrete slab must be dry, clean, smooth, structurally sound, and free of foreign materials that might prevent adhesive bond as described in the current edition of ASTM F710, Standard Practice for Preparing Concrete Floors to Receive Resilient Flooring.
- The concrete slab must be protected from ground moisture with an effective and intact vapor retarder that conforms to the requirements of the current edition of ASTM E1745, “Standard Specification for Water Vapor Retarders Used in Contact with Soil or Granular Fill Under Concrete Slabs.”
- The concrete slab must be placed directly on the vapor retarder.
- The concrete must be wet cured with a moisture-retaining curing cover. Do not use spray-on curing compounds because these reduce the drying rate of concrete and can interfere with the adhesive bond.
- Before installing the finished flooring, moisture, alkali, and bond testing must be conducted.
- Moisture testing must be performed in accordance with the current edition of ASTM F2170 “Standard Test Method for Determining Relative Humidity in Concrete Floor Slabs Using in situ Probes” (preferred method) or in accordance with the current edition of ASTM F1869, “Standard Test Method for Measuring Moisture Vapor Emission Rate of Concrete Subfloor Using Anhydrous Calcium Chloride.” See the section on Moisture Testing for more details.
- Unless otherwise indicated in the adhesive specifications, the surface of the concrete must have a pH of 9 or less when tested according to the method described in the current edition of ASTM F710.
- Bond testing must be performed to determine compatibility of the adhesives to the concrete slab.
- After the concrete has cured and is dry, clean construction joints, saw cuts, score marks and cracks, and fill with an underlayment. Use high quality Portland cement, calcium aluminates, or gypsum-based products. The floor fill, topping or underlayment must also have a minimum compressive strength of 3500 psi. When using these products, be sure to follow the manufacturer’s recommendations regarding application, drying time, and moisture testing. S-194 Patch, Underlayment & Embossing Leveler, S-463 Level Strong and S-466 Patch Strong meet or exceed this requirement as underlayments.
- Repaired areas must be finished flush with the surface of the concrete and allowed to fully dry before the installation of the floor covering.
- Actual expansion joints or other moving joints with elastomeric fillers are designed to absorb movement in concrete slabs. Cementitious underlayments, patches and resilient flooring installed across expansion joints often crack or buckle when the slabs move. Armstrong Flooring does not recommend flooring products be installed across expansion or isolation joints. Expansion joint covers are available for use with various floor coverings and should be specified by the architect.
- Dusty concrete slabs may be primed with one coat of S-185 Latex Primer. Sweep or vacuum the concrete and apply the S-185 with a 3/8” nap paint roller. You may also prime concrete subfloors with the recommended flooring adhesive for the material about to be installed.
- A rough concrete floor can be ground smoothly with a commercial diamond or carbide-equipped grinding machine. If the concrete subfloor is extremely rough or uneven, it may be too great a job to smooth this way. In this case, apply a cementitious underlayment such as S-194, S-463 or S-466. A smooth, flat, uniform surface is necessary as a good base for resilient flooring.
Above-Grade Concrete Floors
Above-grade concrete is usually protected from most sources of moisture except the moisture initially in the mix and water vapor in the atmosphere. As with concrete placed on and below grade, above-grade concrete must be kept damp during the curing process to permit hydration to occur. Concrete poured on a metal deck is often produced with lightweight aggregate that can retain excess water longer than normal-weight aggregate. Because drying is only possible from the top surface, such construction usually takes additional drying time. Floors on metal decks or above-grade structural concrete floors must be dried and must meet the same requirements as for slabs on and below grade. Follow steps 7-14 above.
Curing, Sealing, Hardening, or Parting Compounds
Curing compounds leave a film that can interfere with adhesion. Use should be avoided on surfaces that will later be covered with resilient floor covering. Where applicable, a letter of compatibility should be obtained from the manufacturer before the use of a curing compound.
When curing, sealing, hardening, or parting compounds have been used, the following general statements can be made:
- If they contain soap, wax, oil, or silicone, the compounds must be removed before a resilient floor can be installed. The compounds can be removed by using a terrazzo or concrete grinder, by sanding with a drum sander or by using a polishing machine equipped with a heavy-duty wire brush.
- There are many materials that do not contain soap, wax, oil, or silicone and are advertised as being compatible with resilient flooring adhesives. Conduct bond tests to determine the need for removal.If the bond fails after 72 hours, the compound must be removed.
NOTE: In the event of adhesion failure, the responsibility for warranties and/or performance guarantees rests with the compound manufacturer and not with the manufacturer of the resilient flooring and/or adhesives.
Existing Resilient Floors
Armstrong Flooring products may be installed over a single layer of existing resilient flooring when the proper installation system is used for the new product and the existing resilient flooring meets the proper conditions. Armstrong Flooring does not recommend installing new flooring over existing rubber or slip retardant floors.
NOTE: The responsibility for determining if the old resilient flooring is well-bonded to the subfloor and is not textured or embossed enough to show through the final installation rests with the installer. Installations over existing resilient flooring may be more susceptible to indentations
Required flooring conditions:
- Not textured or embossed enough to show through the new installation.
- Only a single layer of flooring.
- Fully and firmly bonded on an approved subfloor and underlayment.
- Waxes, polishes, and other finishes must be properly removed with a recommended floor stripper. For existing linoleum, the stripper should not exceed a pH of 10.
- Indentations or damaged areas must be replaced or repaired.
| Resilient Tile | Resilient Tile | Asphalt Tile | Vinyl Plank | Vinyl Plank | Sheet | |
| Category | Below Grade | On Grade & Suspended | On Grade & Suspended | Below Grade | On Grade & Suspended | Not Cushioned or Foamed Backed -All Grade Levels |
| HOM | √ | √ | √ | |||
| HET | √ | √ | √ |
Polymeric Poured Floors, Metal, Ceramic Tile, Quarry Tile, Terrazzo & Marble
Armstrong Flooring commercial sheet may be installed directly over polymeric poured floors. To install flooring over polymeric poured floors, the surface must be roughened and then a Portland cement-type underlayment applied. Mix S-194 with the S-195 Underlayment Additive.
Polymeric poured floors must be well cured, have no history of moisture related problems, be free of any residual solvent, smooth, structurally sound, and well bonded to a concrete subfloor. Loose or damaged areas must be completely removed and patched with S-194, as necessary. Remove any “nubby” texture with wet, sharp sand and a floor machine equipped with carborundum stones. Do not use a skim coat of latex underlayment to smooth the surface as it will not adhere reliably.
Armstrong Flooring commercial sheet may be installed directly over ceramic tile, quarry tile, terrazzo or marble subfloors on all grade levels which are firmly bonded to a structurally sound substrate. Clean the floor of all paint, varnish, oil, wax and finishes. Roughen glazed or very smooth surfaces and repair badly fitted joints or cracks with, S-466 or S-194. If the floors are badly worn or have low places, they should be leveled with, S-466 or S-194.
To install over metal, the surface must be roughened and then a Portland cement-type underlayment applied at a minimum of 1/8” thickness. Mix S-194 with the S-195 Underlayment Additive.
JOB CONDITIONS/PREPARATION
- Resilient flooring should only be installed in temperature-controlled environments. It is necessary to maintain a constant temperature before, during and after the installation. Therefore, the permanent or temporary HVAC system must be in operation before the installation of resilient flooring. Portable heaters are not recommended, as they may not heat the room and subfloor sufficiently. Kerosene heaters should never be used.
- The surface shall be free of dust, solvents, varnish, paint, wax, oil, grease, sealers, curing compounds, residual adhesive1, adhesive removers and other foreign materials that might affect the adhesion of resilient flooring to the substrate or cause a discoloration of the flooring from below. Spray paints, permanent markers and other indelible ink markers must not be used to write on the back of the flooring material or used to mark the substrate as they could bleed through, telegraphing up to the surface and permanently staining the flooring material. If these contaminants are present on the substrate, they must be mechanically removed prior to the installation of the flooring material.
- In renovation or remodel work, remove any existing adhesive residue1 so that 100% of the overall area of the original substrate is exposed.
- Allow all flooring materials and adhesives to condition to room temperature for a minimum of 48 hours before starting the installation.
- The area to receive the resilient flooring should be maintained at a minimum of 65° F (18° C) and a maximum of 100° F (38° C) for 48 hours before, during and for 48 hours after completion.
- During the service life of the floor, the temperature should never rise above 100° F (38° C) nor fall below 55° F (13° C). The performance of the flooring material and adhesives can be adversely affected outside this temperature range.
- Conduct calcium chloride tests or percent relative humidity tests on concrete. Testing for internal relative humidity of concrete slabs must be conducted in strict accordance with the current edition of ASTM F2170 Standard Test Method for Determining Relative Humidity in Concrete Floor Slabs Using in situ Probes. All tests must meet allowable moisture limits. Any area that exceeds the allowable moisture limit must be further dried to an acceptable level or treated with a moisture remediation system before flooring installation. Performance of any third-party moisture remediation system rests with the manufacturer of that system, not with AHF Products. These tests are only indicators of moisture conditions at the time the tests are conducted.
- MVER tests must be conducted in accordance with the current edition of ASTM F1869 Standard Test Method for Measuring Vapor Emission Rate of Concrete Subfloor Using Anhydrous Calcium Chloride. When performing these tests, it is important to remove any curing agents or residues down to the bare concrete. The calcium chloride tests are to be performed only on ordinary concrete floors and are not applicable on lightweight concrete, smoothing or leveling compounds, gypsum underlayments, or other fills.
| Adhesives | % Internal Relative Humidity (RH) | MVER, lbs. per 1000ft2 / 24 hours | pH |
| S-995 | On or Above Grade: 95% Below Grade: 90% | — | On or Above Grade: 8 – 10 Below Grade: 9 |
| S-999 BondStrong Tape | All Grade Levels: 99% | ≤ 25 lbs. / 1000 ft2 | On or Above Grade: 8 – 10 Below Grade: 9 |
| S-1000* | 100% | 25 lbs./1000 ft2 | 5 – 14 |
| Flip Spray | All Grade Levels: 95% | — | 5 – 11 |
*Only for use with homogeneous sheet in environmental conditioning units
BOND TEST:
- Bond tests should also be conducted to ensure compatibility with the substrate. It is recommended that this test be used to determine the compatibility of resilient flooring adhesives to concrete subfloors after the removal of old adhesives, curing agents, parting compounds, dust inhibitors, oil, grease, paint, varnish and other special surface treatments or conditions. Using the flooring material and recommended adhesives, install 3’ x 3’ panels spaced approximately 50’ apart throughout the subfloor area. Select areas next to walls, columns, or other light traffic areas. Tape edges of panels to prevent edge drying of adhesive. When testing where a curing agent has been used, the curing agent must be removed in some areas for bond testing. If the panels are securely bonded after a period of 72 hours, you may conclude that the subfloor surface is sufficiently clean of foreign material for satisfactory installation of the resilient flooring.
- As an alternative to the removal of residual asphalt cutback adhesives or installing directly on metal substrates, apply a minimum 1/8” layer of cementitious underlayment, such as S-194 Patch, Underlayment and Embossing Leveler ™, or comparable alternative as approved by the underlayment manufacturer. All warranties and/or performance guarantees concerning third-party underlayment failure rest with the underlayment manufacturer and not with AHF Products.
- Many adhesive removal products contain solvents that leave a residue within the subfloor. This residue can negatively affect the new adhesive and bleed through the new floor covering. The use of asbestos encapsulants or bridging materials over asphaltic adhesive is not recommended. These products may affect the bonding properties of the new adhesive.
- Radiant-heated substrates must not exceed a maximum surface temperature of 85° F (29° C).
- Concrete floors should be tested for alkalinity. The allowable readings are determined by the adhesive being used for installation.
FITTING
- Unroll material and lay flat to allow the roll curl to relax before fitting.
- Material must be adhered within 4 hours of cutting and fitting.
- Before installing the material, plan the layout so seams fall at least 6” (15.24 cm) away from subfloor/underlayment joints. Do not install over expansion joints.
- When installing over an existing resilient floor, plan the layout so the new seams do not coincide with seams or joints of the existing installation.
- Recommended fitting procedures include freehand knifing, straight scribing, or pattern scribing.
| Adhesive | Set-in-Wet | Dry-to-Touch | Working Time | Traffic Post-Installation |
| S-995 | Open Time: >10 minutes. Trowel: U Notch 1/32″ (0.8 mm) deep, 1/16″ (1.6 mm) wide, 1/32″ (0.8 mm) apart; porous substrates only | Open Time: >15 minutes. Trowel: U Notch 1/32″ (0.8 mm) deep, 1/16″ (1.6 mm) wide, 1/32″ (0.8 mm) apart | 2 Hours | Light Foot Traffic: 24 Hours Heavy Traffic & Rolling Loads: 48 Hours |
| S-1000* | Open Time: 10 minutes Trowel: 1/32″ (0.8 mm) deep, 1/16″ (1.6 mm) wide, 1/32″ (0.8 mm) apart | — | 45 Minutes | Light Foot Traffic: 3 hours Heavy Traffic: 4 hours Heavy Rolling Loads: 6-8 hours |
| S-999 BondStrong Tape | — | — | — | Light Foot Traffic: Immediately Heavy Traffic & Rolling Loads: Immediately |
| Flip Spray | Open Time: Approximately 30 mins or more | Up to 4 hours | Light Foot Traffic: Immediately Heavy Traffic & Rolling Loads: 24 hours |
ABUTTING DIFFERENT GAUGES OF RESILIENT FLOORING
When installing thinner gauge material next to thicker gauge materials, install thicker material first and then butt a 12″ (30.5 cm) wide piece of scribing felt against the thicker material. Adhere the scribing felt to the subfloor with suitable adhesive. Use S-194 Patch, Underlayment and Embossing Leveler or S-466 Patch Strong™ to feather the edge of the scribing felt to the level of the substrate. Allow the patch to dry completely before installing the flooring. Scribing felt is not recommended to be used under the entire installation.
PROCEDURE
S-995 Adhesive
- Cut pieces to the proper length, allowing enough material at each end to flash 1-1/2” (31.8 mm) up the walls for fitting. NOTE: If you cover wet areas or cover the adhesive too soon, blisters will form after rolling. Blisters caused by inadequate drying time will begin to show within one hour after rolling. The amount of open time will vary according to job conditions, temperature, humidity, air flow and type of substrate.
- Before installing the material, plan the layout so seams fall at least 6” (15.24 cm) away from underlayment joints, seams in existing resilient flooring and/or saw cuts in concrete. Do not install over expansion joints.
- Cut pieces from the roll to the specified length, allowing enough material at each end to flash 1-1/2” (31.8 mm) up the wall for fitting.
- Recommended fitting procedures include freehand knifing, pattern scribing and straight scribing methods.
- Fit piece #1 and position in the room.
- Prepare the seam edge by trimming the factory seam edge using an edge trimmer.
- Draw a pencil line on the subfloor along the length of the trimmed factory edge.
- Carefully lap the material back halfway to expose the subfloor.
- Starting at the lap point and working toward the end wall, apply the adhesive up to the pencil line.
- Allow the recommended open time before placing the material into the adhesive. Use extreme care when positioning the flooring over the adhesive, which has a firm grab and does not allow repositioning.
- Starting at the center and working toward the edges, roll the material in two directions using a 100-lb. roller, staying 2” (5.1 cm) away from the seam. Clean adhesive residue from the surface of the flooring using a clean, white cloth
dampened with a neutral detergent and water. - Repeat steps # 8 through #11 for the remaining half of piece #1
- Cut piece #2, allowing enough material at each end to flash 1-1/2” (31.8 mm) up the wall for fitting.
- Overlap piece #2 onto piece #1 approximately 1/2” (12.7 mm). Prepare the seam edge on the opposite side of the sheet by trimming the factory seam edge using an edge trimmer.
- Draw a pencil line on the subfloor along the length of the trimmed factory edge.
- Carefully lap the material back halfway to expose the subfloor.
- Starting at the lap point and working toward the end wall, apply the adhesive up to the pencil line.
- Allow the recommended open time before placing the material into the adhesive. Use extreme care when positioning the flooring over adhesive, which has a firm grab and does not allow repositioning.
- Starting at the center and working toward the edges, roll the material in two directions using a 100-lb. roller staying 2” (5.1 cm) away from the seam. Clean adhesive residue from the surface of the flooring using a clean white cloth
dampened with a neutral detergent and water. - Repeat steps #17 through #20 for the remaining half of piece #2.
- Follow the same procedures for the remaining pieces, completing one piece at a time until the job is finished.
- Clean adhesive residue from the surface of the flooring using a clean white cloth dampened with a neutral detergent and water. Give special attention to seam areas as they must be clean and dry before proceeding with heat welding
or sealing. - Do not allow traffic on the flooring for 24 hours after installation.
- Newly installed flooring should not be exposed to rolling load traffic for at least 48 hours after installation to allow setting and drying of the adhesive.
Flip Spray Adhesive:
A clean substrate is extremely important with the use of Flip Spray Adhesive!
Thoroughly sweep and vacuum the substrate first. Damp mop to remove any remaining dust or debris. Extra attention to substrate preparation is essential for a successful installation. Failure to properly clean the substrate may result in telegraphing of debris.
Bond testing prior to the installation will help identify the appropriate application rate, open and working time, and any potential bonding problems to the substrate or flooring.
COVERAGE:
Rate of application depends on flooring product being installed and porosity of the substrate.
- Shake the can well before each use.
- Point can downwards, press the side of the nozzle tip as you slowly walk back and forth overlapping the spray pattern for an even spray coverage. Do not use a sweeping motion as this may cause uneven coverage. Clean up any larger drops that may occur. Refer to the provided spray patterns for proper application. Over-application, especially for sheet vinyl may cause adhesive telegraphing.
- Allow the adhesive to dry completely with no transfer to fingers when lightly touched. Open time will vary depending on the adhesive coverage, substrate porosity and the ambient conditions. Working time for the adhesive should not
exceed 4 hours. - Install the flooring as per the Armstrong recommendations for that particular material.
- Roll the floor immediately after the installation is complete with a 100 lbs. roller. Sheet flooring seams may be heat welded immediately after installation.
Normal traffic may be allowed as soon as the installation, finishing and clean-up are complete. Wait 24-hours for heavy traffic or rolling loads.
Normal traffic may be allowed as soon as the installation, finishing and clean-up are complete. Wait 24-hours for heavy traffic or rolling loads.
SAFETY AND CLEAN UP:
Wet adhesive overspray or drips should be cleaned up immediately with soap and water on a clean cloth. Dried adhesive may require the use of a solvent adhesive cleaner. Between uses, clean the spray tip immediately with a clean wet cloth to prevent accumulation of dried adhesive.
Empty aluminum spray cans should be relieved of excess pressure and recycled or disposed of in accordance with local requirements. Do not expose to temperatures exceeding 115° F. Prolonged exposure to heat or direct sun may cause container to burst.
S-999 BondStrong Tape
Read all installation instructions thoroughly before installation
- Mark all layout lines prior to placing S-999 BondStrongTM Tape.
- Begin by placing the S-999 BondStrongTM Tape roll against the wall starting at the corner of the room. Peel out enough material to reach the corner of the installation area and press in place.
- Carefully continue to roll out more material making sure to avoid air entrapment during placement. When nearing the opposite side of the installation area, peel out an excess of the material and cut with a utility knife and press in place.
- Move the roll back to the starting position, peel out a section of the material and butt up tightly to the previously placed sheet. Do not overlap seams.
- Continue to roll out and apply material until the installation area is completely covered.
- Trim excess material around perimeter of the installation area using a utility knife. Press the material into the subfloor or wall by using a shop broom with pressure applied to the entire surface.
- Peel back enough of the release liner to expose the layout line. DO NOT PULL BACK FURTHER OR REMOVE EXCESS RELEASE LINER.
- Begin to place the flooring in line with the starter line and press into place. Take care to place flooring in proper position as replacement on top of S-999 BondStrongTM Tape is very difficult and may result in damage to the flooring
- Pull back additional release liner and continue to place flooring. As soon as enough flooring has been placed to work on, the balance of the release liner may be removed, and the flooring installed.
- Roll flooring with a 3-section 100 lb. (34.0-45.4 kg) roller.
Medintone Sheet in Environmental Conditioning Units
- Maintain temperature of the room at a minimum of 65° F (18° C) for 48 hours before installation, during installation, and for 72 hours after installation. Maximum room temperature is 100° F (38° C). If these temperatures are not maintained for the recommended period, the flooring material and adhesives may not perform as they should.
- Follow installation and seaming details for Full Spread S-995. Seams must be heat welded.
- Use S-1000 adhesive at all floor drains. Apply a 3″ (7.6 cm) band of S-1000 adhesive around any floor drains in area of installation.
- Roll the material in two directions using a 100-lb. roller. Roll immediately after placement of flooring and re-roll again 1 hour later. Clean adhesive residue from the surface of the flooring using a clean, white cloth dampened with a neutral detergent and water. Dried S-1000 Adhesive cannot be removed.
- Immediately after installation, apply a bead of silicone caulk along the top of the cap strip and onto the wall.
- After the material has been installed and allowed to condition for 72 hours, gradually lower the temperature of the room over a period of 3 days. The temperature of the room should never go below 34° F (1° C).
- Do not allow traffic on the flooring for 24 hours after installation.
- Newly installed flooring should not be exposed to rolling load traffic for at least 72 hours after installation to allow setting and drying of the adhesive.
SEAMS
Heat Welding
- Flooring installed using the dry-to-touch method may be heat welded immediately. For all other installations, wait a minimum of 10 hours.
- For Heterogeneous Sheet, route or groove the seams to a depth 1/2 to 2/3 the thickness of the full structure. Do not expose the backing by routing too deeply.
- Use router equipped with a 3.5 mm (0.138″) thick blade and guide wheels. In areas where a power router cannot be used, use a hand groover.
- Make sure the routed seam is free of dirt, adhesive and particles produced by routing.
- Cut the weld rod long enough to weld about 3/4 of the seam.
- Set the correct welding temperature and pre-heat welding gun for several minutes.
- Attach the appropriate tip (nozzle) to the gun and adjust to the proper temperature. Use of pre-heated welding nozzles will require higher temperatures.
- Feed the weld rod through the welding tip and apply the weld rod into the routed seam.
- The heat gun is at the proper angle when the bottom of the nozzle is parallel to the floor. Welding is accomplished by pulling the heat gun slowly toward you.
- Control speed so a ridge forms on both sides of the weld rod. Be careful not to burn or char the surface of the floor.
- To stop welding and change directions, first make a ramp. Skive the weld rod 1″ to 2″ from the end of the welded seam. Using a hand groover, groove the skived section of the weld rod.
- Start welding from the opposite direction, continue up the “ramp” and overlap the initial weld for several inches, creating a splice.
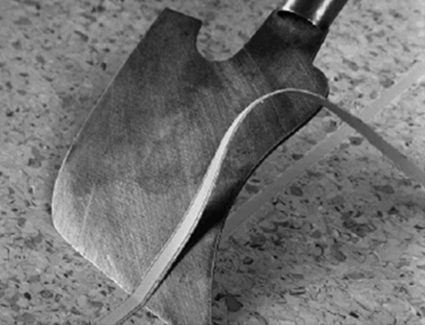
- Skiving the weld rod should be done in two passes to minimize concave seams. On the first pass, use a spatula knife and a trim plate, skiving away the top part of the weld rod while it is still warm.

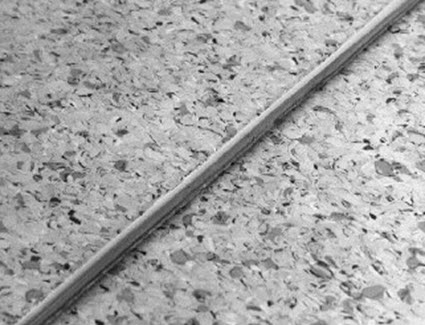
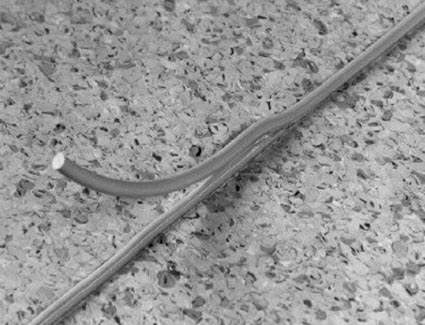

- After the weld rod has cooled to room temperature, remove the remaining excess weld rod on the second pass by holding the spatula knife flush with the flooring (Fig. 7). Smooth, continuous passes result in smooth seams. Repeated stop/start actions result in rough seams.
- After the final skive, wipe the welded seam with a clean, damp cloth. When dry, following the manufacturer’s directions, apply a thin, even application of a commercially available, high-quality multi- purpose top coating such as S-762 Weld Rod Coating Pen. Use care when applying the finish to avoid over-application onto the wear layer of the adjacent sheet flooring material. In high traffic areas, apply one or two additional coats, making sure the finish is completely dry between applications.
SEAMS
Heat Weld Repairs
- Remove the damaged rod with a hand-grooving tool. If the original seam was grooved using a routing machine, you can easily remove the welding rod with a hand-grooving tool. If the original seam was grooved using a hand-grooving tool, you may have problems with the seam being wider in places and removing the rod with a hand-grooving tool could make the seam even wider and harder to weld with the new welding rod. When grooving the seam, take out the width of the original rod. It is not necessary to groove out the entire depth of the rod. If the original rod is firmly bonded, this will not create any problems. Once the seam has been grooved and cleaned out, you can weld the seam with the new rod following the recommended temperature settings for the flooring material.
- Skive the excess rod from the flooring surface in two passes. On the first pass, skive away the top part of the welding rod using a spatula knife and trim plate while the welding rod is still warm. The welding rod must be cooled to room temperature to remove the remainder of the welding rod on the second pass. Remove the remaining rod by holding the spatula knife flush with the flooring surface while skiving.
SEAMS
S-763 Adhesive
Seam Adhesive is not recommended in healthcare operating rooms, procedural rooms, or any space where an aseptic environment is necessary. Heat-welded seams are recommended for those types of applications.
- Use a recess scribing tool to recess scribe all seams net.
- Insert a piece of scrap material beneath the scribe mark. With the scrap on the same side as the cutting hand, cut the seam at a 90° angle. Be sure to hold the knife blade straight up and down.
- Remove the scrap piece of material.
- Cut the tip of the S-763 Seam Adhesive applicator bottle and apply a continuous 1/8″ (3.18 mm) bead of S-763 Seam Adhesive along the seam edge.
- Tuck the seam edge into place, forcing the S-763 Seam Adhesive up through the seam.
- Clean adhesive residue from the surface of the flooring using a clean white cloth dampened with a neutral detergent and water.
- Roll the seam into place using a hand roller.
- Remove burr at the seam by carefully skiving with the back of the linoleum knife.
- Roll immediately in both directions with a 100-lb. roller.
FLASH COVING
All normal fitting methods can be used to flash cove. Apply a coat flash coving adhesive or vinyl tape (3.75″) up the wall, or S-995 Adhesive with the recommended trowel on the floor as well as up the entire cove area. Allow adhesive to dry to a pressure sensitive state between applications. Roll the flooring into the adhesive with a hand roller.
REMOVAL OF RESILIENT FLOOR TILE, SHEET FLOORING AND “CUTBACK” ADHESIVE
RECOMMENDED WORK PRACTICES
Instructions for removing resilient floor tile, sheet flooring and asphaltic “cutback” adhesives are not contained in this manual. Refer to the current Resilient Floor Covering Institute’s (RFCI) publication Recommended Work Practices for Removal of Resilient Floor Coverings, which addresses each in-place product type: resilient floor tile, resilient sheet flooring, asphaltic “cutback” adhesive or other adhesive.
REGULATIONS AFFECTING THE REMOVAL OF EXISTING RESILIENT FLOOR COVERINGS
- Various federal, state, and local government agencies have regulations governing the removal of inplace asbestos-containing material. If you contemplate the removal of a resilient floor covering structure that contains (or is presumed to contain) asbestos, you must review and comply with all applicable regulations.
- Vinyl-asbestos tiles and asphalt tiles contain asbestos fibers, as did some asphaltic “cutback”adhesives and the backings of many sheet vinyl floorings and lining felts. The presence of asbestos in these products is not readily identifiable.
- Unless positively certain that the product is a non-asbestos containing material, you must presume it contains asbestos. Regulations may require that the material be tested to determine asbestos content.
- The Recommended Work Practices are a defined set of instructions that address the task of removing all resilient floor covering structures, whether or not they contain asbestos. When the Recommended Work Practices are followed, resilient floor covering structures that contain (or are presumed to contain)asbestos can be removed in a manner that will comply with the current Occupational Safety and Health Administration’s (OSHA) Occupational Exposure to Asbestos Standard’s Permissible Exposure Limits (PEL).
- Numerous products, devices and techniques have been introduced and/or recommended for the removal of resilient floor covering structures. Armstrong is only able to endorse the RFCI Recommended Work Practices. Before you use any other practice for the removal of an in-place resilient floor covering product that contains (or is presumed to contain) asbestos, you should determine if the practice meets all applicable regulations or standards, including those of OSHA, for occupational exposure to asbestos and that the material will be compatible with the new floor covering to be installed.
- See federal and location regulations on lead-based paint testing, safety precautions and notification requirements.
| WARNING: EXISTING IN-PLACE RESILIENT FLOOR COVERING AND ASPHALTIC ADHESIVES. DO NOT SAND, DRY SWEEP, DRY SCRAPE, DRILL, SAW, BEAD BLAST, OR MECHANICALLY CHIP OR PULVERIZE EXISTING RESILIENT FLOORING, BACKING, LINING FELT, ASPHALTIC “CUTBACK” ADHESIVE, OR OTHER ADHESIVE. These existing in-place products may contain asbestos fibers and/or crystalline silica. Avoid creating dust. Inhalation of such dust is a cancer and respiratory tract hazard. Smoking by individuals exposed to asbestos fibers greatly increases the risk of serious bodily harm. Unless positively certain that the existing in-place product is a non-asbestos-containing material, you must presume it contains asbestos. Regulations may require that the material be tested to determine asbestos content and may govern removal and disposal of material. See current edition of the Resilient Floor Covering Institute (RFCI) publication Recommended Work Practices for Removal of Resilient Floor Coverings for instructions on removing all resilient floor covering structures or contact your retailer or AHF Products at 866 243 2726. AHF floor coverings and adhesives do NOT contain asbestos. |